| Day 125 |
 |
Bending the portlite frames |
| Day 125 |
|
Bending the portlite frames |
| It's a small
start but we are back outside and working on the boat at
last! My project is making the portlites, Genas is to weld in plate for the fuel tanks under the engine. She always gets the fun stuff! Her progress will be shown in the upcoming days. We aren't able to put in full days on Saturday yet so only four hours today. Making
the portlites looked simple at first, just bend some
flatbar around for a frame, back it, and weld it into a
hole. |
||
|
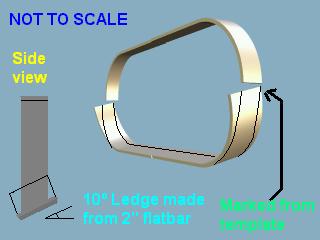
The
solution for us is #3. I will be showing the whole
"proposed" lay out in days to come. To the left, the graghic shows how to make a ledge that is abled down, and it seems to have worked! The lower half is actually much shorter hieght-wise, hence "not to scale", and is comprised of 2" flatbar as opposed to the 1 1/4" of the top part. For the templateI bent the lower piece, clamped the two together, overlapping them, set and marked the 10º turn, and layed it on a box. After the box was marked, that part of cardboard was slotted out to allow it to sink into the box so it would be flush again. The surface of the box was used to mark the line along the 2"on both sides. |
|
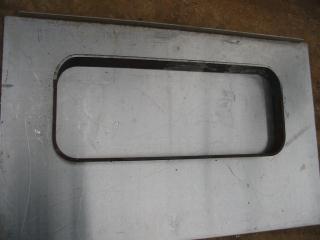
| The two were
pulled apart, and the lower carefully bent back out and
flattened, then the excess cut off with the plazzie. This formed the template for all the pieces I have been cuttin today. ( pic at top of page ) |
||
 |
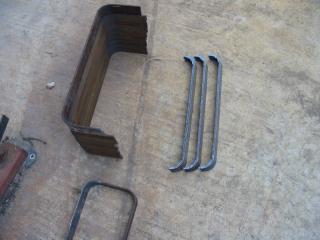
The 2" flat bar was
marked using the template piece, then bent, then cut. I
had to remember to leave a few inches of excess bar on
each end so the bender had something to grab on to. For
20" portlites only a 30" piece was needed. Of course cutting them out mostly freehand wasn't perfect and some ginding has to be done. It would have been easier to cut the curved ends first then bend it, but unfortunately the thing would slide out of position and make all sorts of funny angles! ( I tryed last year! ) Good for a lawn ornament I guess! The pic to the left doesn't show it well, plus the frame is upside down, but this is how it will look....well sorta. |
|

Heres the bender for those who have never seen one before!
They need to be bolted down to the concrete, use good bolts!
Day 125:
4 hours:
Bent and cut some portlite frames
To DAY 124 |
 Sales, Service, Installation |
To DAY 126 |