| Day 130 |
 |
Mast and engine supports and engine brackets |
| Day 130 |
|
Mast and engine supports and engine brackets |
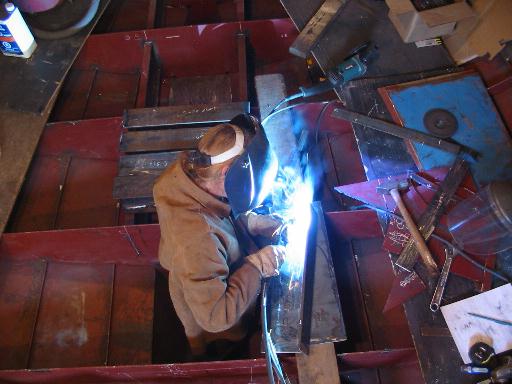
| Gena had previously welded up the mast supports out of 8" wide plate and 3" 3/8 flatbar on top and bottom to make an "I" beam of sorts. This was then welded in under where the mast will be keel-stepped. A 1/2": plate will then be welded across as the seating area for the mast. Once all in place the beams sure stiffened everything up! | |
 Gena welding in mast supports. Engine hoist can be seen in the background |
The engine mounts are the
same thing pretty much except the top of the beams needed
to be about 6" to allow for some variation in the
position of the engine mounts themselves. We positioned the engine yet even lower, and I was glad that the plate I cut ( for the top part of the aft deisel tank in the keel ) was from a curved radius plate left-over. It really needed the extra bit of space under there! |
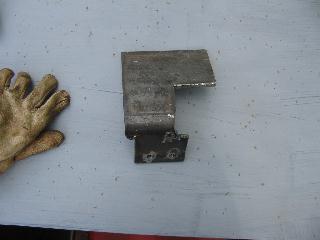
| My job was to
make the new engine mount brackets. I surprised myself
with how accurate they ended up! The measurements were pretty rough for the strange shapes I had to cut. I rubbed a piece of paper over the mounting holes on the engine to get their position, then used that to drill the brackets out. They all fit perfectly!! |
|
| To the right is the last
one I cut and drilled. See what I mean by strange shapes? All four are now bolted on to the engine and are pretty close to level with the block. ( Dumb luck there I think haha! ) We must hold off on drilling the engine mount holes until we have a better idea if the port-starboard position of the motor. This may have to wait until we get the propshaft and tube in place. |
 |
| The rest of the work we did today wasn't boat related. We fabbed a table out of steel for the deck on the house to match the seats. Hey, why not? We have all the equipment to! | |
Day 116:
7 hours - Put in engine mounts/ supports and made brackets.Welded
up mast supports.
to DAY 129 |
Motorhome CB Installations That Work! |
to Days 131+ |