| Day 264 |
 |
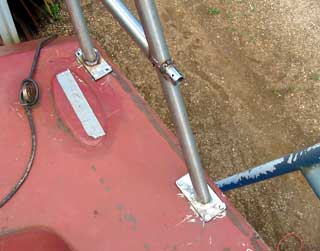
Radar arch bases
Entry frame |
| Day 264 |
|
Radar arch bases
Entry frame |
| The entry way
from the cockpit needs to have a fair lip on it to butt
into the gasket on the doors that will butt into it. This
area was of particular concern as we don't like drop
boards, but also need to minimize the space an open door
will take up. The solution is to split the door into two sections. This way the lower door can be left closed during heavy rain or rough sailing conditions with waves breaking over the sides without worrying about inundating the inside of the boat with run off from the cockpit. The clearance at the bottom is quite low compared to most, so this almost is a necessity. |
 |
The bottom part of the door will flip down on hinges, and the top part will hinge over to the bulkhead. After I bent the frame Gena welded it in. It was then that we realised the remaining opening will not be big enough for our water tanks ( 2 45 gallon bulk window washing fluid containers ) to fit through there. Duh! We'll need to melt the edges to get that extra 1/2" in hehe.
|
| The bases for the radar arch needed to be welded on ( above photo ), so I took on that job. The hex head bolts were a real pain to thread in/out for some reason after the nuts were welded in. They are some odd sort of stainless that we definitely won't be using. Anywhere. They seemed to have expanded and locked in. They were soft enough to strip even though they were only 1/4" into the nut! This wasted valuable time not to mention made us frustrated. | |
| We have welded
in many nuts that were only 1/4" without a problem
but these bolts were all terrible!! "Never accept substitutes" is the message for today. |
 |
The radar arch can now be removed at will to final weld and polish, but we'll leave it on to show off hehe! | |
 |
Shown to the
left is the rudders tiller arm in place. It all fits! The
rudder turns freely so alignment is good too! We are
lucky as many builders have told us this can be a
difficult procedure, getting everything aligned. For us
it just fell into place. Bravo to Finns Machine Shop in
Nisku! Gena must weld up the flanges and the base under the hull now that we know it's all ok. The square machined out on the top is for the emergency tiller. A hole will be left here in the bottom of the berth so one can insert the tiller that will go straight up through the hatch above and into the cockpit. Even though the emergency tiller will be long, it won't be good at all for rough sea conditions but it's better than nothing! |
||
| l think that if anything is going to fail, it will be the top flange and nothing can be done about that. | |||
| Meanwhile, on the boatcam
today I was installing some 17 mounting tabs around and
under the pilot house front window. ( Photo right ) The forward corner of the side windows also needed some for of edge so I split some pipe for that. The top window tabs have been offset to allow access to the nuts of the bolts that will hold in the window by simply removing the bottom panel. Similar to a trucks head liner, it will drop down to the window height. This is hard to explain so I guess you'll have to wait until we're doing that part of the intereor some days ahead. |
 |
| Below is a pic stolen from the boatcam broadcast today. And to the right is the mobile boatcam in action. It works well, but I must be careful where I place it lol! | |
 |
 |
Day 264:
6 hours - welded on arch mounts, tabs around pilot house windows,
rudder, cockpit entryway
Marine Radios Sandy's CB Shoppe |