| Day |  |
More hand rails,
exhaust pipe |
| The final welding on the pilot house was done today. Not much more needs to be done before the last area of the boat gets some foam insulation. | ||
| Every good
thing must come to an end, but there will be some SS
welding making the companionway doors and the stanchion
mounts on to the bolwark, then of course the bow sprit. It's just the usual mad rush to get everything buttoned up for winter. This time we are truly ready, let it snow! To the right are photos of one of the hand holds out on to the coaming, ( also good for a drink holder to clip on! ) and some side rails along the steps to the forward deck. The standard toe rails wouldn't work too well here because they use up so much room. We plan to bolt on a large cleat as well making it "look" functional! Below is the now not to be used air intake frame that I rushed to get under way today. It was one of those change our minds at the last minute things.
It's just a waste of
(expensive) stainless. I can't even think of an alternate
use for it. |

|
 Welding on exhaust pipe flange |
The engine also needs a way
to expel the exhaust. This has been a really drawn out
topic between us and I had a preference toward below the
waterline. The system
wouldn't need a muffler, wouldn't pollute adjacent boats
in the marina, and doesn't seem as obnoxious. ( Except to
the fish! ) Above the waterline condensation can still happen on a lesser scale and will leave nasty rust stains down the hull if not drained before starting the engine. The heat becomes a problem and burns the paint off although again this is more of a cosmetic problem above the waterline. A muffler needs to be carefully inserted and extra framing at the exit point to stop "drumming" of the involved plate. |
||
| Gena has
decided to go above the waterline and add a flange to
dissipate heat as well as isolate the engine from the
hull. Electric isolation is important even here. A
high-heat gasket will need to be used as well as small
tubes for the bolts in the over sized holes. A heavy "flange" made of stainless also is seated into the hull. This way is paint starts peeling, it will have a couple inches of stainless to peel off of first.
|
|||
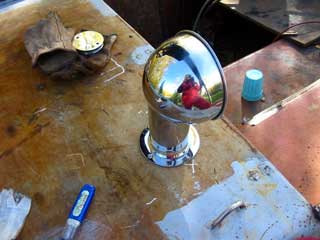
| I just kept
with the simple stuff top sides! The photo to the right
shows how nicely this air vent fits into the hole I
plazzed out. This is no ordinary vent. It will be the
heater ( I call it a fire place because it looks like a
tiny one! ) exhaust vent. We're not sure how well this
will work but we have 2, and it's worth a try. A rather
short stack, but it can be unscrewed, capped, and best of
all, modified easily. The
one opposite this one is for part of the engine
room hot air exhaust system. The duct leading to this
will have a manual damper so air can be circulated back
into the boat. It will help replace some of the air the
engine is drawing off. |
 |

Exterior view of the exhaust
Get the first -
*BIG
SAILBOAT PROJECT SCREENSAVER*
Auto-installation for Windows
Day 279:
8 hours - Final exterior stainless attachments welded on,
including lock hook, exhaust pipe mount
To DAY 278 |
We've
remixed him, he's remixed us, Now he has an awesome new
album!! |
To DAY 280+ |