| Day 303 |
 |
Hatch frames, aft
cupboards |
| Day 303 |
|
Hatch frames, aft
cupboards |
On a boat, things are different to a house or a motorhome. The possibility of a broach ( the boat on it's side ) or worse, a
complete roll, is ever present in stormy seas. Everything potentially heavy
-meaning if someone threw it at you, and it hit you in the head, that it
wouldn't cause injury! Everything needs to be tied down or put in stowage, or
cupboards. The doors on the cupboards must be latched closed by habit, or
default. Regular catches like clip or magnetic styles can't hold back much in,
say, a 90º sudden turn.
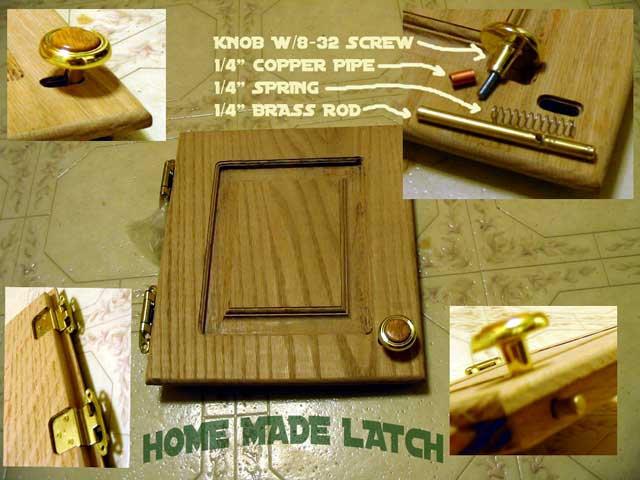
Locking door and drawer latches are required.
| After many hours of research and experimentation ( elaboration ) I finally came up with a viable solution to the latch problem. After searching all over the internet, and in local stores, we came up empty handy in our quest for the perfect latch! | |||||
|
|||||
| The diagram (as previously
shown ) seems simple enough. There turned out to be 3 problems with the
design: 1 - The shaft was too short and started binding against the inside of the hole, remedied by increasing length from 2" to 3". 2 - The knob screwed directly to the shaft would be so recessed into the door, one couldn't grab it to pull the door open. 3 - The Knob needed to have a spacer so it would ride along inside it's little shelf, not suck down into the slot as it was tightened. Trying to find suitable tubing for the "stand-off" was difficult. I ended up using some 1/4" tubing. A little bigger than I wanted, but works all the same. As can be seen in the top collage of insets, the knob is inconspicuous, yet functional as a latch. They slide smoothly and don't rattle as the spring keeps it pressed into the end of the slot. The rod was tapped to 8-32 and smoothed of burrs. Some lubricant should be applied (even though they are smooth now) to add some protection to the interior wood. Don't want these swelling in the moisture! Anyway they will work, yay! Gena was busy today putting in the bathroom sink and the tub enclosure.
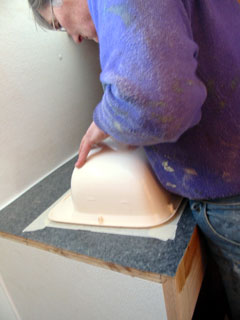
The positioning of the sink required some thought. The angle should be even with the vanity face as that's what we're all accustomed to. It had to be far enough from the vertical on the right side to allow elbow room while washing, yet not cut across the corner too much. I think it's just right where it's at. If it wasn't, too late - it's glued in with silicone! We were lucky to have found that little sink while we were hunting around in bargain shops in Vancouver BC. House sinks are just huge now in comparison, almost as big as our tub! ( Photos right ) Gena got really stoned gluing on the stub urround with that "special" glue that is for surrounds that was half dried up and probably not from this past years' stock. Then PL400 was added between for good measure. |
   |
||||
| The "use in well ventilated
areas" should be heeded on that one. Problem was all the layers of ice
and snow had basically sealed the hatches shut and would have taken all
day to chip off. I wouldn't recommend it though. She had a headache all
evening after that.
|
|||||
|
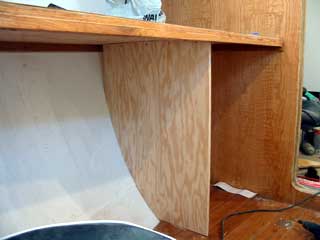
I continued working on my desk. The sides must butt into the shape of the hull of course, and have a perfect vertical front edge. I used a batten method we had used for parts of the cabin and aft. A 4' level is placed where the forward edge will be. Equal measurements are marked, say every 6", down from the desktop to the floor. Once the curve comes in quickly switch to marking 3" intervals. For this it was the last 4 marks. Use a straight edge ( use the bottom of it ) and a small level to keep it level to get distance at each mark along the vertical level. I used a length of oak trim and marked directly, then measured each afterwards. Use this as the guide and fill in the dots on the piece of plywood to be cut. |
|
||
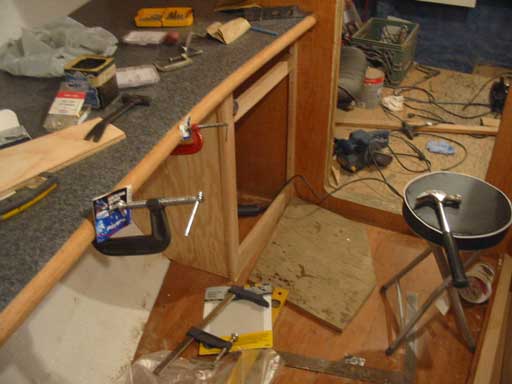 |
In the photo to the left the face
is on. The oak over has a nice round edge and is notched for the half inch
ply to seat into. ( Just the way I like to do it because of the added strength of the join ) One note to anyone doing this type of facing: Care must be taken to ensure the face is straight so the door will seat flat onto it. I used a scrap of ply to check before screwing in place. The cross piece for a drawer was put in with dowels. That's a topic on it's own. I'm lucky, I could be shown how by Gena :) |
||
| The interior is a lot of work but I actually enjoy this fine woodwork! | |||
Day 303:
9 hours+ : Put in vanity sink, tub and enclosure, Built right side of desk,
finished some door edges
To DAY 302 |
Vertex Commercial VHF, Authorized Dealer |
To Day 304 |
|