| Day 336 |
 |
Final fairing Painting hull |
| Day 336 |
|
Final fairing Painting hull |
| After the initial "primer" spray coat of Ceram-kote 99 marine, we could see the many defects in the hull. This was to be expected as we hadn't even smoothed the filling patches. Regular primer couldn't be used but A second coat of ceram-kote only requires scuffing of the first coat. | ||

|
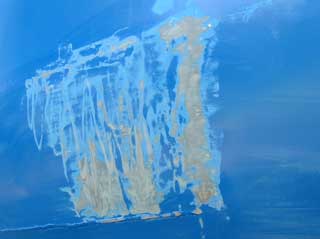
Any where there were welding "undercuts"
and imperfections along seams, we trowelled some body fill then sanded
back smooth. The large patch ( photo left ) is likely the most filled
area on the hull. Fortunately we left the ceram-grout in that so
only a thin layer of fill was needed to get it smooth. Gena further smoothed those pesky stringer weld bumps using the paint as displacement fill. A few mils makes a difference between a very visible bump and one not noticable. We can see why so many builders end up using white in the hull. Any other color really shows the imperfections. Our trick is to roller on the second coat dissipating the "mirror finish" somewhat. Thinning the paint down with 2 ounces of acetone allows the bumps created by rolling to smooth off some. This will make it easier to clean. We learned that from our little boat. The gel coat made little bumps when rolled on, and was a constant bugger to clean. Speaking of bumps, the white paint on the top edge had to be smoothed down flat with the belt sander to reduce lumps.
|
|
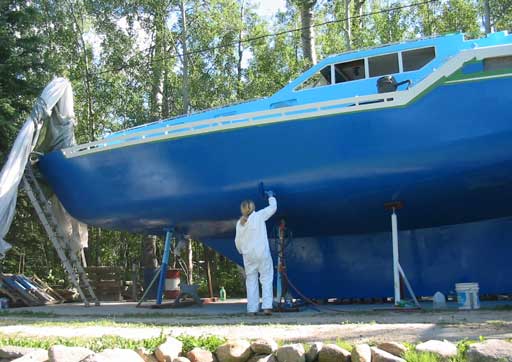
| After so many hours of prep
and the time it took me to get the masking done, we resigned to the fact
that we'd only complete one side today. We weren't sure how long the
paint would cure so didn't want to leave painting too late. The photo to the right shows the masking scheme. Getting a straight ( or constant ) line around a hull is a bit of a trick! It took me several tries before getting the hang of it. I first marked the line with blue felt pen dots every foot or so. I attached the tape near the bow and, instead of matching the dots, attempted to average them with the tape. Nothing is ever perfectly accurate, visually checking the line is best. Slight raises in the bulwark rail or measuring errors amplified the dots position. After pulling a few feet of tape along the dots, I flipped the roll on to the deck and checked the line.
|
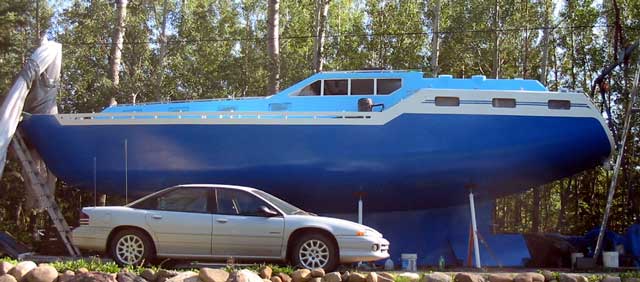
 Scuffed, smoothed, and ready to paint! |
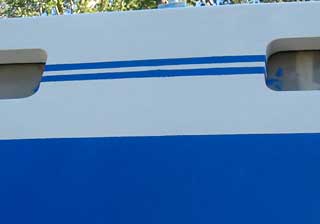
| The curving of the hull also
makes continuity difficult. If the line was wobbly I just pulled the
tape back out and re-set it, even if it meant moving away from the dots
some. It seems to have worked because the line is dead on! Because of the bumpy white edging, the tape had to be pressed into it to make sure of a good seal against the blue. The graphic design ( I painted it up on the computer along with 6 others ) is to break up the large white look if the poop deck. My girlie senses tell me that white makes things look big in clothing and design, so other than changing the color this is a good second option. The curl down at the end of the lines accentuates the rounded corner. ( Both made by cutting tape around the largest cymbal of my drumset he he! ) The white going down so far under the bulwark in my opinion stopped the look of an "added bulwark rail" and also makes the pilot house look lower and more streamlined. A thin horizontal line would have decreased the appearance of length because the hull color would be larger. ( Compare the photo below with the "peeled" photo at the bottom of page ) |
|
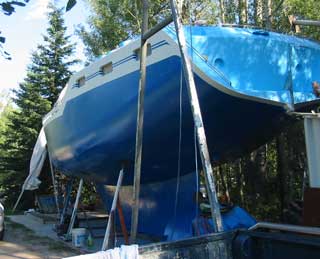
 Me painting hull. Ouch! My arms getting sore! |
Somehow the whole hull painting
thing became my job. I've never done this before he he! I paint pictures in
oil on canvass. This is really quite different than that, but that was good
enough for Gena. Away I went! Rolling along, I made certain that each stroke blended into the previous. Gena went along and advised me of any imperfections. After doing the whole side there was lots of paint left over from the can so Gena suggested going over it again. (This is advised practice on the spec sheet for a second pass ) It's a good thing we did because I found some small spots I missed that showed through white! |
||
|
|||
| For the most part,
the masking went well. It wasn't 100% though, the photo above right shows
this. The bulging line was caused by forgetting to press the masking tape
down here. Of course it's the bumpiest part of the whole thing! It'll be fixed when we do some white touchups ( yes there are a couple of pin holes along the starboard bow area! ) and painting of some interior door frames etc. All in all she is lookin' good! Notice the
reflections still remain a bit? I had a thought on fairing a steel hull: the
fairing process can make soft areas, thin the hull, and cost lots. ( Our
friend paid 1/2 a mil for a pro job! ) |
|||
 |
|||
Day 336:
11 hours - Finished smoothing hull and fills, masked and painted the port side.
Marine Radios Sandy's CB Shoppe |
 |