| Day36 |  |
Serving up the aft radius plate |
| Day36 | |
Serving up the aft radius plate |
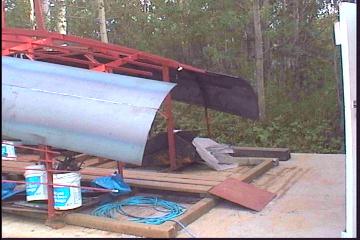
| Even though the lower part of the aft section went in easily, the top half had to twist some and therefore took some time to seam in. A lot of grinding was in order, as, even though the plate had been pulled in tight to be marked for cutting, the aft part had to be re-cut to over an inch more. | ||
| Once the
excess is removed, the last few inches of the join will
likely have to be ground out again to allow for a
continuous curve in to the transom. The other side we tryed something new for the top section. As we had cut the plate over size, we decided to pull in the whole piece tight and then cut it out while still up, using the lower plate as a template. This worked quite well and only required half the time grinding and fitting. |
 |
 |
At last the
radius plate is all on! We still have to trim off the
excess along the top and bottom as some is too over size.
Next weekend we will be fairing up some coning between
some of the joints. This may require fabrication of a
pull-in clamp that will draw in small sections of the
join, to be split, faired in, and re-tacked to completely
remove the cone. |
| This has to be
done before serving up the large flat plate as it may
flatten outward some. Suprisingly, the aft frames stayed
in place, contrary to what we thought would happen once
the aft plate was put on. I guess the lower half
stabilized the whole thing and stopped any vertical
movement. We are glad to see the whole length radius panelled, and it looks really good! Shortly I will post an enlarged full side view so you can see for your self. |
|
Day 36:
11 hours - Put on the rest of the aft radius plating.
To DAY 35 |
Tough
Radio Repair job?
Call Sandy's CB (780) 986-7433 |
To DAY 37+ |
