| Day 445 |
 |
Genas desk seat |
| Day 445 |
|
Genas desk seat |
| This is probably one of the trickiest projects I have done in recent months, and one of the riskiest as far as predictability is concerned. In short, I can't say how this on will turn out. Sometimes I feel like hiring a machinist, and if I was rich, I would have here! |
| The apparent complexity in this
design was caused mostly by the lack of room in the area. The seat cannot be
fixed in position because it totally blocks the gangway going aft. In
addition, the support can't be fixed because of the hull curving upward. A
support is required because the floor is wood, and only lag bolts can be
used.
If I had had an inkling of where the desk would have been, or even that a desk would be there, I would have welded in a steel plate as a support. One can only plan so far ahead, but maybe planning this far ahead would be good advice to future boat builders? |
Wave mouse over video box or click here to watch in your player. |
| I happily went to work measuring,
then butchering a poor office chair to suit it's new lot in life. I chopped
off 4 legs, leaving only 1. This is the reason we acquired plastic supported
chairs and not metal. After being cut, the metal would rust, chrome would
peel, and things would get generally ugly. The shape of the arm, only slightly modified from when the video was made, required the lone plastic leg be hammered into position. This is good! The base flange was a high pressure fitting in a past life, and saved me a bit of work albeit far heavier than needed. I welded on a top flange then lined up the hole with several positions in a 90 degree turn to drill a hole for each position the seat may rest at. Once again if a picture is worth a thousand words, then a video is worth a million! I won't describe this part any further.
|
 |
| In the video, one can plainly see the locking mechanism. It is simple, but not elegant enough. It would have caused problems with the other design changes as well so I chose to make a pull pin style catch. | |
 |
It took a little "backyard machining" but with
careful welding and some patience (not always a predictable mood with me!)
it was together. The nut still needs to have a finger ring welded to it, so Gena can release the thing quickly when I need to get aft to use the head. The cup is basically a short length of 1/2" pipe with a washer welded onto the end. The pin is straight 3/8" rod. As a side note, we bought lots of SS rod, 1/2",1/4",1/8", and 3/8". The 3/8 ran out furst, then the 1/4". There's still plenty of 1/2". It'll probably never be used being the most expensive and all. |
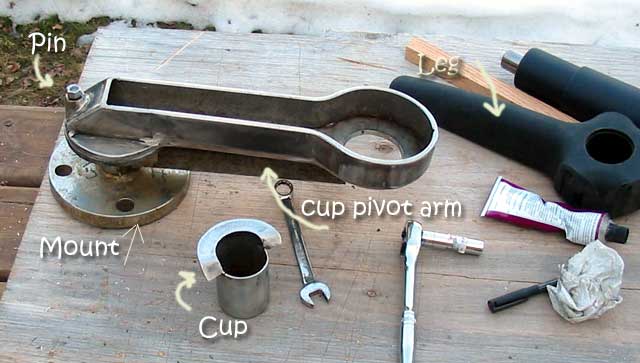 |
This image (left) shows the key parts of the
system. Notice how nice the pin looks?
The cup will be welded onto the pivot arm next. The type of spring to use here might be difficult to obtain, but I'll just put a short one across 2 screws, one attached to the pivot arm, the other to the main arm. |
 |
The leg will be affixed using a couple of
bolts straight through and some screws on the round part. Well, there it is in position! The stops seem appropriate (by design or luck, not sure which!) but can't be fully tested for comfort until I buy some lag bolts to replace the number 10 screws currently holding it in place. |
| Gena was having an
interesting day. Remember back when I was putting lattice on the forward
berth? The new material has much smaller holes, thus will be stronger. It
needs to be over such a large area as a queen size mattress.
I warned Gena, having experience at it myself, to heat the aft up before attaching the sheets, several times. She didn't and now it's sagging in the one area it shouldn't - the entry point. I was a bit angry because the glue was already set, and I had to make a small support to fill the sag. It worked. As I've been ragging on Gena here, it might be only fair to mention that the original lattice she fit was melted by me and the barbeque! The brown stuff doesn't much like heat. |
 |
| Even though it didn't need
it, we agreed it might be good to add some center support as well. Gena made
a strangely shaped thing to seat on to the support bar for the rudder tube. It's solid now! Can't wait to use it. Incidentally, we will be using an air mattress. I have used them for 2 years, every night, before springing a leak. When we hear of the problems people have with foam, this may be a good solution. |
 |
| Gena also managed to get the
little locker doors under the berth on. With a bad cut due to the Tupperware
lockers not fitting around the rudder assembly, they had to be oriented
vertically. I still think drawers would have been easier, but these are easy to pull clothes in and out of. I will use mine for the only 2 things I'll need while at anchor: PJ's and a bathing suit ha ha! |
 |

Finger pull on nut
Day 445:
13 hours: Made seat mount, put surface on aft berth.
| Replace
this button with a link to your site, mailme ..to Main page |