| Day 449 |
 |
Foam- Flogging! /
carpeting / DASH PC |
| Day 449 |
|
Foam- Flogging! /
carpeting / DASH PC |
| Nothing like playing with silly foam I always said! Gena is having a grand old time with it, even though I hear it's particularly hard to get it off of screen windows. "I'll clean it up!" she sternly re-assured me as I ran frantically through the foam on the deck pressing it into the wood with my new shoes. She cleaned it off the screen alright, but left what was on the glass for me 2 days later. Guess I should have been more specific when I said clean "it" up. | |
| Oh well, it's all fun and games, razor
blades on glass, and whatnot. All of those spare cans of foam we had
left over from doing foam touchups around frames etc. turned out to be
many cans less. The stupid things dried up and wouldn't work. There
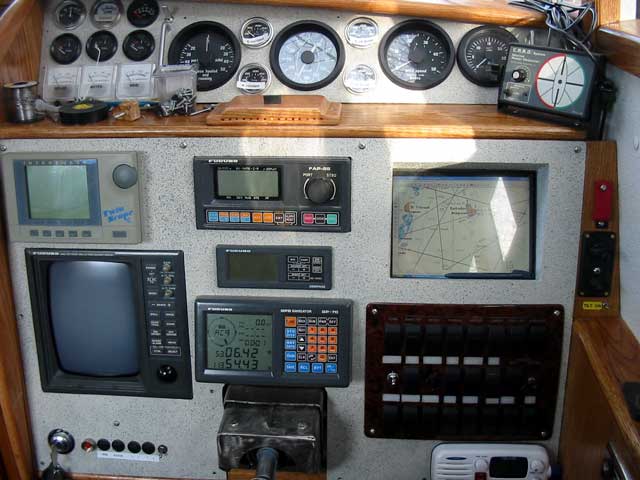
should be a refund/return policy on those cans. What a waste! Gena continued work on those pesky floor hatches, framing and foaming, waiting then putting high heat insulation on each. Then custom sized aluminum plates were cut for each and riveted to the split drainpipe sides. The photo ( bottom right ) is of the hatches in place, ready for the trim and carpeting to go on. She plans to put a good coat of "Blue Stuff" on, then some extra at the edges. This will semi-glue the carpet in place. We have learned that just gluing carpet of any kind to plywood is a bad idea. Eventually the carpet will become worn, and need to be replaced. It is a nightmare to get off once glued! Notice how the aluminum split pipe was screwed on. The screws are countersunk so as not to interfere with the aluminum trim depth. Lookin' good! |
  |
| My project-du-jour,
as more or less planned, is the long awaited Dash PC. This is a tablet PC
that will be mounted in the dash. I had done up the rough case already, but
needed to get it wired in today so the dash can be finished up. After a few hours, I realized I may have bitten off more than I could chew on this one. I had to uncharacteristically plan the series of stages to optimize my time. First thing was to get the face lexan blacked in so it would be dry later in the day. This is to hide the ugly under-workings of the thing once in place. |
|
 |
Everything fits, and the
components including the power supply, a USB hub, a video to USB converter,
an RS-232 to USB converter, and a custom dimmer control had to be
strategically placed. Readers can always tell when things are pretty intense
with this designer/builder. Photos don't get taken, and proper documentation
doesn't get recorded. All the "stuff" is
in there any way!
The rest of the USB hub has a video converter ( so radar or mastCam video can be recorded by the PC) and a RS232 to USB converter for the GPS input to allow tracking in a program such as the Cap'n or Fugawi. |
 |
The dimmer, which was almost
forgotten, auto-dims the display some when the dash lights dim. The whole
thing can be powered down or put in standby from a single 3-position
switch in the switch panel. The "off" position cuts power to the power
supply entirely, the on/momentary on starts the PC or puts it into standby.
To properly shut it down requires using the windows start button. Here it all is doing a heat test ( running the CPU at 100% for an hour ) while I eat lunch! The back of the sealed box is an aluminum plate and does dissipate some of the heat as predicted. |
| The rest of the diagram shows the SVGA signal which goes to the big TV below, that way we can watch DivX movies or study charts in comfort! While a stereo audio line also goes to the TV, a video line goes back to the Dash PC from a switch that switches from radar to mastcam. Some fun stuff for sure! Might as well cover all the bases as I hate doing wiring after the fact. | |
 Test hookup... |
|
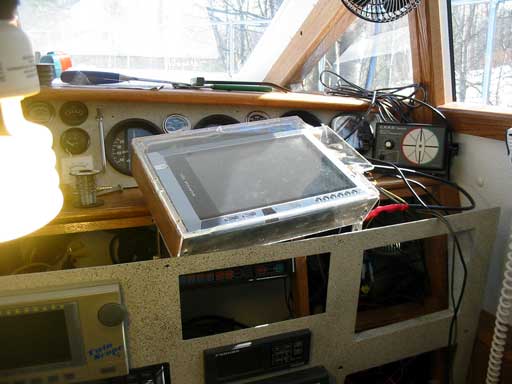
| Because the box must go in from behind, it was a really tight squeeze to get it in behind the dash panel recess... |
 |
 |
|
| ...but once in
place, it was all worth it! Little tabs on the box were used to screw it in
place, but the top ones didn't work out so I put one large screw going down,
then put a cap on the hole. The tablet pen still works fine through the
lexan, but we will be getting a trackball mouse (MemoryXpress is the lowest
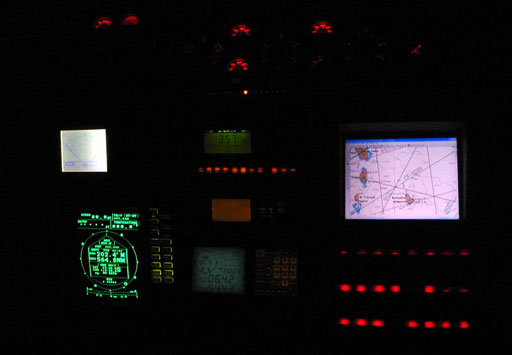
price) , and mounting it on the arm rest. I couldn't wait until night to get this photo (below) but, even with the dimmer, a red lexan screen will need to be sat in the frame to prevent loosing one's night vision. Everything seems to be working! |
|
 |
|
Day 449:
12 hours: made floor hatches and mounted Dash PC
| Replace
this button with a link to your site, mailme ..to Main page |
