| Day 59 |  |
Smoothing keel-hull join |
| Day 59 |  |
Smoothing keel-hull join |
| Well here we
are, already into a new season, and all ready for a new
stage of our project!! This summer we hope to have the hull turned over and the deck done. I guess all our readers are equally impatient for the project to resume! Thanx for all the emails and inspiration from everyone! They are greatly appreciated, and we hope these pages are an inspiration to other potential builders also. Over the winter we investigated many subjects that will soon come into play. These included propulsion type, diesel or electric, hull paint, topsides paint, rudder bearings, shaft bearings, winches, windlass, and radar. As the $$$ couldn't be spent elsewhere (ha ha!) we have made a number of purchases from Ebay, and have successfully acquired 2 large winches, suitable for primaries, and 1 extra winch for whatever...( we're not sure where that'll go yet! ) a windlass, and a radar. We forfeited our winter holiday for these items, but the price was right. Besides, we couldn't happily spend all those $$$ on holidays without feeling guilty....These are the sacrifices one has to make!! Anyway, it's a few less purchases to worry about when the time comes. Our first day back on the job went by quickly, and WOW!! are we out of shape!! As we have "almost" decided to use CeramKote® for painting the bottom, and likely we won't be using any fairing compound, we couldn't live with the ugly idea of the keel to hull join any longer! |
|
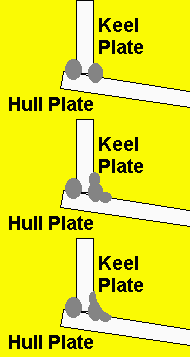
| Why not smooth the join into a round arc so the keel plate would flow into the hull plate. I had just picked up some cone shaped grinding stones for the grinder and figured they would make the job a snap! The moving image to the right explains it all. The gray ovals are welds. As far as we can see, no strength was lost in this process, as the origional weld size is maintained, and others have been added on each side. |  |
| It looks pretty easy, and it was. Just slow going as we only did one side in 7 hours. Getting rid of tiny pockets and valleys was very time consuming. Once again the little Mig was used for this. | |
 |
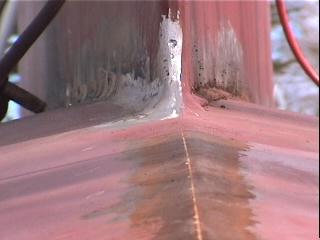
The finished
look is much better than the ridged "hump" was
before. (Right side of keel in photo) The smooth,
uncomplicated surface might even be easier to clear of
buildup once in the water! Once the day was over, we both felt we had done well and felt pretty good about getting back at it. That is until the next morning..OUCH! |
Day 59:
7 hours - Welded and ground smooth 1 side of keel to hull join
(April 29)