| Day96 |  |
Putting up cabintop frames |
| Day96 | |
Putting up cabintop frames |
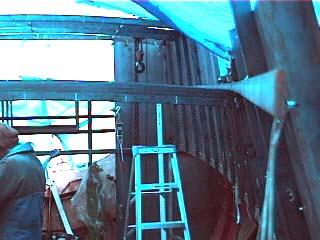
| These ugly
blue-ish photos (being caused by the tarp overhead ) may
continue yet. Today, the end of the first week of May
bearly got above 0 degrees, and the snow is coming down! Not much longer O' trusty torn old tarp! This dampened spririts some, but we accomplished ( almost ) what we set out to do for day 96. Above is a beautiful shot of the cabin slope-in towards the bow. The designer called for 10 degrees, but is an option, so we took it in to 14 degrees to further diminish that " boxy look" and reduce ( perhaps ) a littile topside weight. We faired in all the frames, pulling the plate, by eye, but did use the protractor for the most forward frame. |
||
|
As
for the cabn height, Gena had to stop me at 6'4 in the
center as I wanted to go to "midget height" to
save lots of weight hehe! Anyway, the cabintop framing is coming in smoothly! First, we pulled a string across from fore to aft at known heights above the deck. This was used with a level to mark across to each frame, where the flatbar will be tacked above. The idea is to get all those cambers on evenly at the sides. Looking at pic ( left ) you can see right down the flatbar tacked on which says frames butted up underneath will also come in even. |
|
| Note that the
flat bar is vertical, and it must be or the curve would
cause it to go up in the middle. The reason we used a flatbar was because it almost guarantees the cambers will come in straight at the edges, even though the whole edge isn't level. Because of the camber width coming in less and less, the centers height will drop. ( This was explained on Day 85 ) so the whole cabin top will look like a wedge ...if all goes well haha! |
||
Day 96:
7 hours - Put up cabin side frames, bent 4 more cambers, put up 7
of them for cabin top.
To DAY 95 |
 Sales, Service, Installation |
To DAY 97+ |