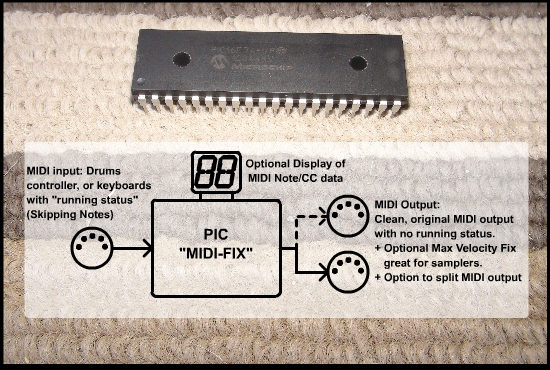
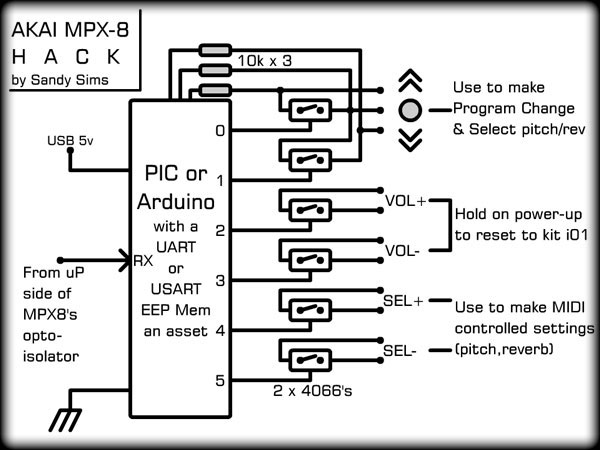
The Circuit:
The trusty old 4066 CMOS quad analog switch is still the best choice for
hacking panel switches like remote controls (I've done), and various
"unknown" circuits. The worry of voltage/timing is erased using this
method. There should be one switch on every button for full panel access.
The pads don't need 4066's on them as they can be selected using MIDI
notes already right?
I had a look
inside the MPX8, and there's certainly enough room to put in the little
board. If using an Arduino, don't have header pins attached as there is no
room vertically. Also, there will need to be the 4066 "sheild" as a
separate board so...
I was looking to see if there was space enough to put some batteries in at
that time I opened the MPX8, they'd have to be LiPo type, or AAA NiMH's.
Also this unit is a pig on power (1/2 amp peaks), so an external USB
battery pack may be better.
The Right Chip:
Any PIC or Arduino with a UART to sniff the incoming MIDI will do, or a SW
UART could be implemented I suppose. I want to use a "bigger" PIC so I can
save the Program Change data, which will be recalled on start-up.
The Program:
Basically, the program (sketch) must be able to hold down the VOL+/-
buttons on start up to reset PC to i01, (don't worry about delay, these
can be held down after .5 seconds from initial power up and it still
resets) wait for 3 seconds for reset, release the buttons, then dial in
the "Kit" by properly pulsing the encoder.
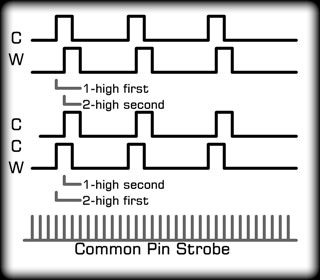
This is where it is a little tricky. To mimic and encoder, there needs to
be 2 pulses, one out of phase with the other. |
 |
| The
waveform diagram to the right shows a basic idea of clock-wise vs.
anti-clockwise pulses from the knob encoder. In a lot of hardware I've
repaired in the past, the common line is constant, but in newer
microcontroller equipment the common is strobed. This is partly
because strobing reduces I/O pin count on buttons, but also because it
can make debouncing easier to implement in software.
The
MPX8 will likely be strobed. This is not an issue using the 4066
switches to control the encoder lines, but to read when a user has
modified the actual encoder knob, which will happen, requires that
they be read (the 3 10k resistors) in a different way.
When one (or both) of the encoder levels is the same as the common,
and the state of the level is that of the strobe, then the encoder
switch is considered validly "on". It's important that the count is
the same as the count the MPX8 will have, or everything will be out of
phase after that!
This isn't really crucial to the program change operation, but I like to
have as many functions as the hack can provide, to make it more
worthwhile doing.
Other MIDI Controllable
Parameters: |
 |
For my own
personal use, maximizing the controllability of the following is a
must!
1) Program Change: The primary reason for this hack, to be able to
select Kits:i01-i09, e01-e99 via MIDI.
2) Tune: To be able to shift the sample frequency on the fly is bonus,
and to use MIDI Pitch Wheel (9 steps) would be easy to implement. [
sel- x 8, sel+ x 3 ]
3) Reverb Control: Sometimes it's nice to have lots of reverb at the
end of a bar on that last kick or scream. [ sel- x 8, sel+ x 4 ]
4) Pan Control: Because the encoder emulation must be at "human speed"
this won't be an instant flip-flop pan, but can pan each note. [ sel-
x 8, sel+ x7 ]
5) OFFset PAD Changes: If the other samples around the samples on the
board are static (i.e. numbered so they are in a predictable order)
then changing the PAD assignments
during a song is entirely possible. This would need to be done with
special MIDI Control Change knobs, or MIDI Bank Select. Also load time
would need to be taken into
account when creating the MIDI song / sequence. It *is* a
possibility, although I probably won't be implementing it.
*The data in [ ] is the sequence on the SEL+/- required to have the
encoder pointing at that particular control. Remember the parameter
must also be selected to a limit (left or right) first; so starting
position is known as that will change with each kit loaded.
Receiving a Program Change
:
This is probably the most important sequence to the
hack. When a Program Change is made by a human user, it will tend to
send loads of program change data as the user selects through the
0-127 choices. Because of the way the MPX-8 handles the selection of
Kits ( annoyingly short delay! ) the accidental loading of a Kit will
be exactly the same in MIDI. The solution to this is to (a) increase
the delay, or (b) initiate the PC using another such as any note, or
CC.
Myself,
I prefer the delay method because it reduces hardware issues, but how
long is enough? 2 seconds? That's my choice! Even in a sequencer, the
correct "instrument" must be found when using automation, but it's
basically an instrument selection that will be sent as soon as the
song is loaded. In my huge project currently underway,
Show-In-A-Box,
the MPX8 will be sorta built in to the panel, so it's important my DIY
sequencer *does* send the Program Change when the song is loaded. Some
Samp's take so bloody long to laod!
That
is the last consideration, keeping track of the last loaded PC ( or
the one loaded at start up) could reduce the load time by not loading
it again! Keeping track of the PC will speed up "turning" the encoder
by offset. So if on Kit 23, but now need to load 20, just go down 3.
So
there you have it. I'm pretty busy with my mega-project mentioned
above so it'll be a while before this gets built, but hopefully it has
given some of you makers out there some good ideas. And if anyone is
considering buying the new MPX16, consider it carefully. It may be
another MPX8 with more "stuff" to go wrong!
I'll add on a program for the PIC, and maybe one for the Arduino if I
get to that, here. Cheers!
Design
Notes:
It's
too bad the LCD display is so embedded, I had high hopes on being able
to read the LCD data into the PIC to know what's on the screen.
Instead it's just LCD voltages, pretty hard to tap off of without
messing up the LCD display contrast etc. |
This Update May
1st 2014
|
Now summer's
over I've begun to recommence with the el. projects, and this hack is
a good spin-up to the more bumpy roads ahead!
I've
decided to continue with the PIC chip in this project, so if you're an
Arduino head, this should be really easy for you to duplicate in
script....well unless you work for Akai and are the SW engineers
that wrote the crap script for the MPX-8 in the first place in which
case this is way over your head. Sorry! |
| For
the Show-In-A-Box integration, I can't use the giant side 1/4" jacks
as they don't fit in the case I made! SO the headphones jack will be
used. Using headphones with a unit that has no batteries seems stupid
anyway. It's not portable hey.
Because headphone
amps have lots of hiss, that circuit must be disconnected from the
1/8" headphones socket, the wires from the 1/4" jacks connected to
there instead.
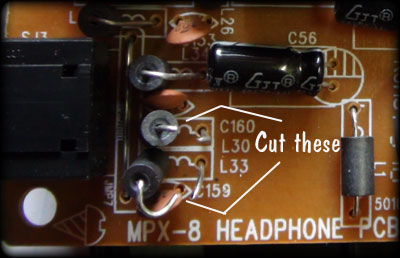
Notice L30 &
33 are cut in the picture. I also removed the 2 .001 uF caps on the
headphone socket because the 1/4" jacks already have those and they'd
only serve to dull off the high frequencies at higher impedances.
So there,
that's done. Not really *the* hack, but a hack none-the-less. |
 |
| As
per the diagram shown here (slightly revised from above), the buttons
must be controlled by the PIC via CMOS 4066 switches. The encoder goes
to ground so that's switch-able using a couple of Q's (3904's).
Notice
I've left the encoder sensing resistors in? Those are no longer for
counting because with the strobe and variable debouncing between them
and me, the PIC and MPX8 are bound to fall out of sync.
Now they are to issue a warning (in the form of a flashing LED) that the
encoder is jammed between clicks. They do that these new cheapo
switches!
I will
be drilling a hole in the face of the MPX8 for it because I don't care
anymore, but if you are doing this hack and don't want ugly hole in
face, just stick it out the "security lock" hole... You'll never use
it because nobody would ever steal your MPX8, at least not before the
firmware update that would make it a much better toy!
Anyway,
back to the actual hack...
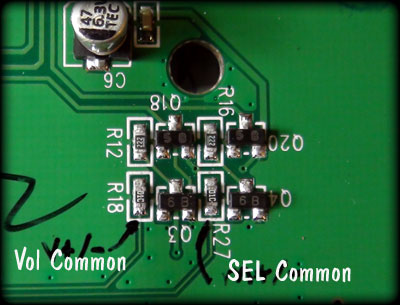
In the diagram the commons for the buttons are for Volume buttons, and the
Select buttons. |
 |
| Now in the
far right photo here, you can see where those must connect. I must
admit, I had one *heck* of a time finding these. I never expected
there to be a 4 transistor circuit to strobe 2 sets of buttons! WTF is
my initial thought! I half expected a circuit like this on the pads
but again WTF?? Maybe they ran out of I/O pins on that huge uP?
I won't
waste my time trying to figure it out any more than trying to figure
out why dandelions are yellow not purple.
The
other sides of the buttons connect to the anodes of the 4 diodes
hovering around the '573 octal latch from the pads. Coincidentally,
the '573 is what I'm using to spread out the main control bus in the
Show-In-A-Box project. They have very low power draw compared to the
old '373/4 (and low $$) |
  |
|
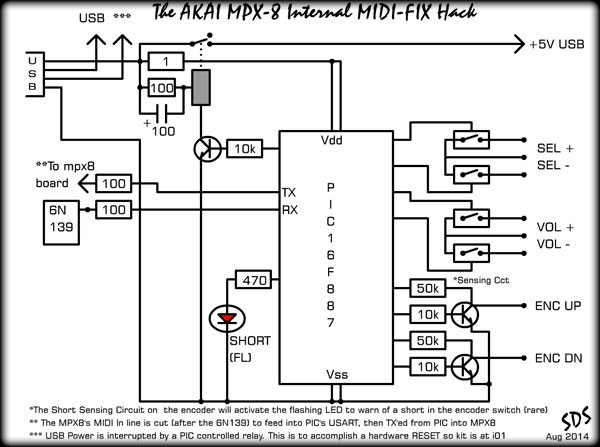
With
the switches taken care of, the MIDI in needs to feed into the PIC
to control them. The more I thought about it, the more it made
sense to break the MIDI in connection to the MPX8's uP and feed it
through the PIC instead. That way, the MIDI-Fix mentioned at the
start of this page can be incorporated into this PIC as well!
As a
matter of design compatibility with any possible marketing of this
board in the future (yep the MPX-16 is on the way lol!) and/or
courtesy to any makers willing to take this on, the MIDI will be
"fixed" so the MPX8 can understand it. For my use it's not
necessary because the MIDI will be filtered and fixed long before
it reaches this part of the chain in the box.
Finally,
the relay (because I'm too paranoid to use anything else) is to
cut the power for a reset / startup condition on power up, and if
there's an error or whatever, control can be re-gained.
Well
that's it for now, I'll be doing a board up shortly, can't wait to
get on this! |
 |
|
Updated
September 1st 2014
| So I
finally had some time to get the hack done! It was a learning
experience, and demonstrated further the sloppiness of Akai's
programming on that damned encoder knob. It's scan rate must be pretty
slow because all I could get out of it (reliably) was 6 switches per
second!
It went
faster but errored after more than 10 positions. It's like the
processor loses focus for a bit, then continues, missing 1 or 2 pulses
from the encoder circuit. No wonder it's such a "crap shoot" to use by
hand.
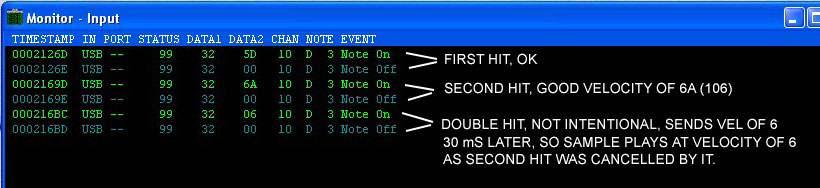
Anyway,
as can be seen in the diagram, a couple of changes had to be made. The
main change is on RC2. This is an output to disconnect the encoder's
ground, rendering it useless during MIDI control.
This "mostly" solves the problem of the encoder resting in the shorted
position, but not entirely. If both are shorted, which happens at the
peak of a click (where it normally can't rest in better encoders) the
MIDI control is rendered useless.
The
LED
indicates that either side of the encoder is shorted in bright yellow.
The user can then tap it so it falls into one of it's tiny grooves, or
wiggle it a bit. As long as it isn't roughed about, it generally stays
in position.
Switching
out the encoder knob created another problem. When the MIDIFIX board
receives the Program Change message (to change kits) the encoder is
disabled. The problem is, sometimes when I'm working on a song in the
sequencer, I need to select a different sample. I can't because the
encoder no longer works!
The
solution is to turn the encoder after a reset, then control will be
permanently on the encoder ...until a reset. On reset, I have made the
MIDIFIX hold the Volume +/- together, then turn on the relay to power
up the MPX-8. This does a reset and the Kit resets to "i01". The
MIDIFIX then counts up 8 so the Program Change starting position is at
"e01". |
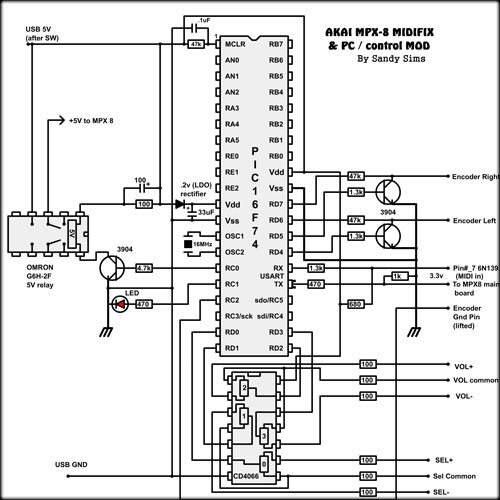
** NOTE: The
PIC Chip is Now the PIC 16F887 ! |
Kits:
The most important aspect for the Program Change to work properly is to
have all 99 kits on the SD Card. At this time, most of mine are empty,
but having all 99 means using the built-in kits i01 - i08 is
predictably at PC # 100 - 107.
The
second most important consideration is time to the kit (kit 1 to kit
99 takes 17 seconds!) and loading time after. So if kits are organized
well, or there simply isn't a lot of active kits, then load times will
be considerably less. This can be important during a performance.
Anyway, the
select +/- buttons are controlled by MIDI Ch.10 Notes 121 & 120
respectively, and the encoder (for use with menu items other that
kits) is Notes 122 for left, and 123 for right. I've made a bit of a
list of do's and don't in the
user manual
, plus other features and methods. |
| For
anyone planning to try this hack, here's some photos of where to hook
wires etc.
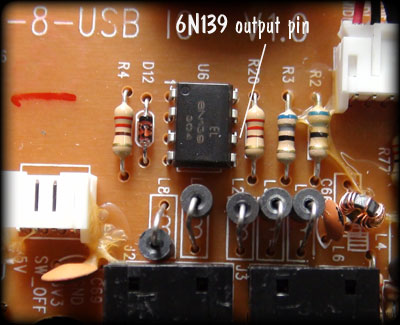
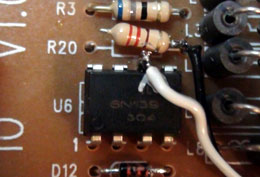
The photo to the
right shows the trace to cut (Pin 7 of the 6N139 chip on MIDI sockets
board) to put the MIDIFIX hack inline. Because the voltages are
already inverted at this stage, no buffers/invertors are needed.
 |
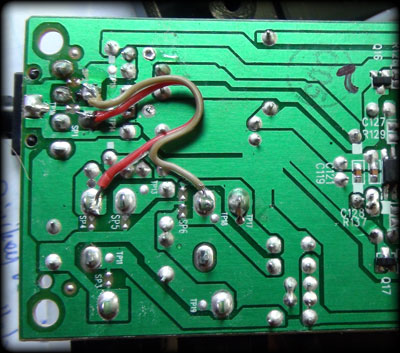
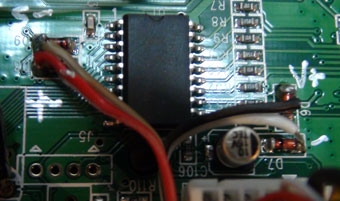
In this little
photo, the white wire (on pin 7) is feeding the MPX-8 MIDI in to
the PIC chip's USART. The black wire is feeding the PIC's USART TX
to the MPX-8.
The 220 ohm
pull-up resistor (to 3.3V) is cut as the PIC chip will
provide the 3.3V via a voltage divider (470 ohm & 1k resistors)
with the new, fixed MIDI data. |
I
almost forgot about the 3.3 volts thingy, as the PIC is normally 5
volts. In this case it's running at about 4.8 V because I had to
isolate it with a LDO rectifier. |
 |
| On
power-up, there is a massive surge on the included power supply,
enough that the PIC chip resets. BTW the PIC chip is now a 16F887, NOT
a 16F74. They're almost the same but I ran out of the others! Too much
MIDI fixin' ;)
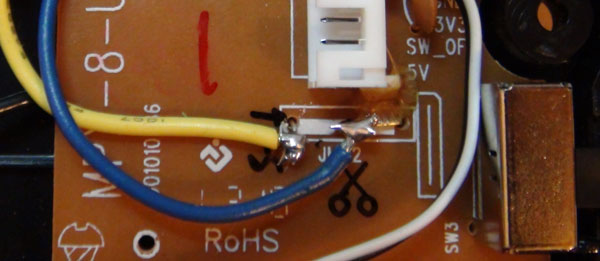
The next
modification is to the main 5V power input. The yellow wire in the
photo to the right has the +5 volts BEFORE the switch. This way the
MPX-8 can be turned off/on without the reset sequence, a sort of
standby. The blue wire is from the other side of the relay.
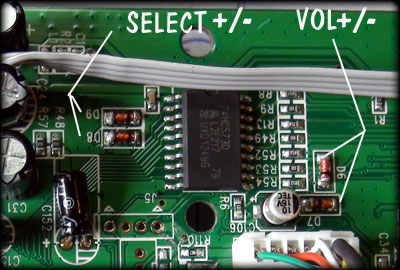
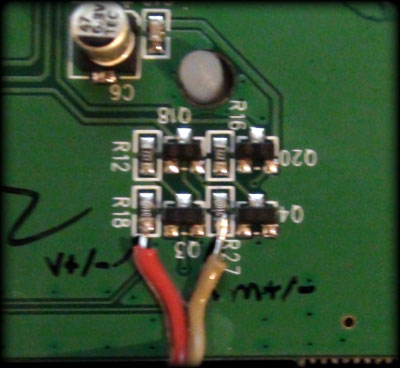
Now
things get a bit more delicate. The Select and Volume +/- connections
are all on the 4 diodes on the main board. Note they are all on
the anode ( not-banded side) side.
The
red wire is the Select +, while the brown wire is the Select -.
The Black wire is on the Volume +, and finally the White wire is on the
Volume -.
The
photo to the far right shows the Button commons. The red wire is the
common for Volume buttons, and the brown wire is the common for the
Select buttons.
The encoder
hookups are Right is the upper pin, and Left is the Lower pin, if you
are looking at the main board with the lettering going the right way. |
  |
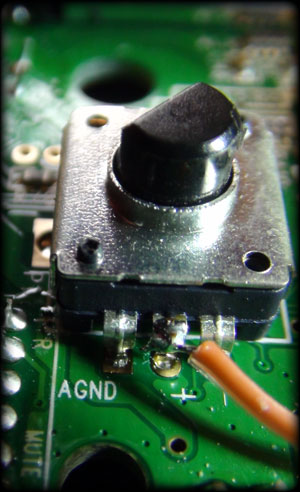 |
Finally, the
encode ground is of course the center pin. This needs to be carefully
cut so the main board must be removed. Be careful not to grease up the
contact pads for the, er, pads! If you suspect you may have (finger
sweat can be nasty to contacts) clean them lightly with alcohol.
I used
some really fine side cutters to snip it at the board (as shown). It's
a pretty cheapo thing so be careful not to torque the case too much.
The orange wire is going to the MIDIFIX PIC's RC2, port C,2.
There's
no need to worry about the 5 volts here as the pin is Tri-stated to
high impedance when the encoder is disconnected.
Well!
There
it is! For the use I have planned, this improves the MPX-8 500%, and
it can now do some pretty cool stuff with MIDI remote button control,
like switching samples in a pad on-the-fly or pitch shifting. It's a
bit slow and dodgy, but with some patience I have found it to be a
real addition to the box.
If you
plan to build this, the .HEX is here, and eventually I'll list the
.ASM file once I "clean" it up a bit (lol) If you don't do PIC, I can
send you a chip if you send a kind email complimenting me on one of my
songs (not my electronics skills because I know I'm good hahaha) and a
bit of money for my paypal account (to cover chip and sending it) I
can send you the chip.
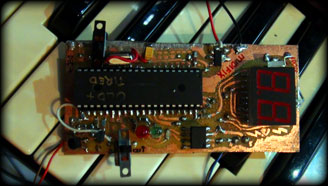
I
haven't shown the board I did because it's really an embarrassing
mess, but it did fit nicely between the 2 fat posts on the bottom of
the case. That's under the pads area, no large caps or plugs there.
Don't
forget to read the
user manual
if you're considering this mod. |
|
One more
thing before I sign off; using an Arduino in this project might be
easier for some. I haven't written it for that, but the Pro-Mini would
be a great choice. If you don't care about the crapping "running
status" recognition in your application, the sketch coding would be
pretty easy me thinks. Eventually I will be completely over to Atmel &
Arduino, but for precision timing and high speed, PIC is still the way
to go! ( Unless you want to use a Raspberry Pi, or Arm board lol! )
Cheers
all!
MPX-8
subject closed
Sandy |
Last Update
September
21st 2014 |