As this project is
extremely electronics orientated, the non-el tech may find it confusing,
so I'm trying to mark the "regular folk" stuff in yellow,
and the tekkie stuff
blue.
Because of the size of
this project, I've decided to break it up into separate sections!
(..and also
because this may be the only place that I can have organized data on it ;)
This has become part of the project because trying to keep my foot on a
tap pedal while dancing around has become such a pain in the butt! This
puppy will end all that (I hope!) and Show-In-A-Box will have the receiver
for it!
As
a project evolves, I find it useful to create the user manual, to see how
it'll be. I've caught lots of menu errors and redundant procedures this
way. If you want to see what it's be like to have this, this page is for
you!
Under Construction:
If above links don't work, then I haven't posted them yet!
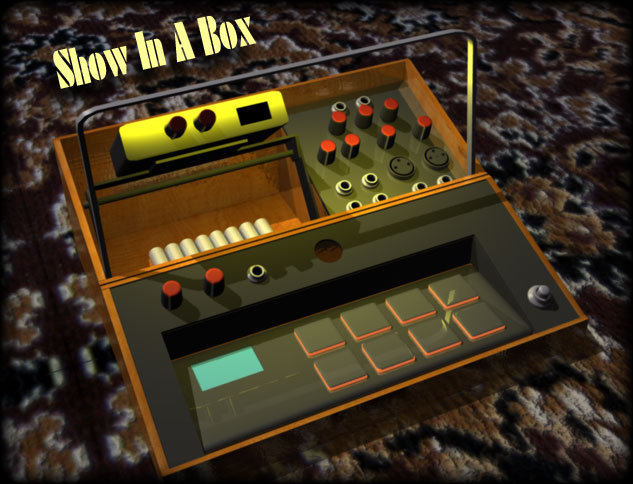
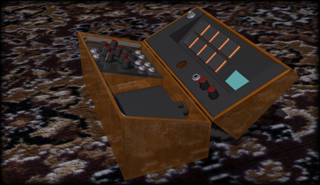
The Picture
above would almost explain what this is, but it can be really versatile
depending on how complicated I make it!
First
though, check out the video I made trying to "K-Tel-sell" it to myself!
Yes, I really do have to do these videos and yes for that reason. I have so
many projects on the go at once, and so many pending, I "shop" for my own
products and salivate over which one I'd like next! It really works for me,
but probably seems psychotic to some.
Anyway, I am getting a
bit annoyed with last minute set-ups and usually like to have a bit more
than a guitar and someone else's mic as I care about being a little
different and having some freedom on stage.
Over the last few months I've been
performing at a lot of open mic's and, while always a fun experience, have
had to deal with plugging my Keyboards, Korg synth, or V-Drums, and
associated audio and MIDI cables in almost instantly as an impatient
audience watches.
No sound checks, no
equipment checks, and a nervous me usually results in a somewhat lesser
performance. Recently I have taken to just setting up off stage, with "safe
but weak" gear. It's a kind of trade-off that I really don't like, so
guess this
idea is more than just a joke. :)
A number one ability for
this box, besides being compact and well laid out, is to be able to run off
batteries and power all the other components. Yay! One less wire!
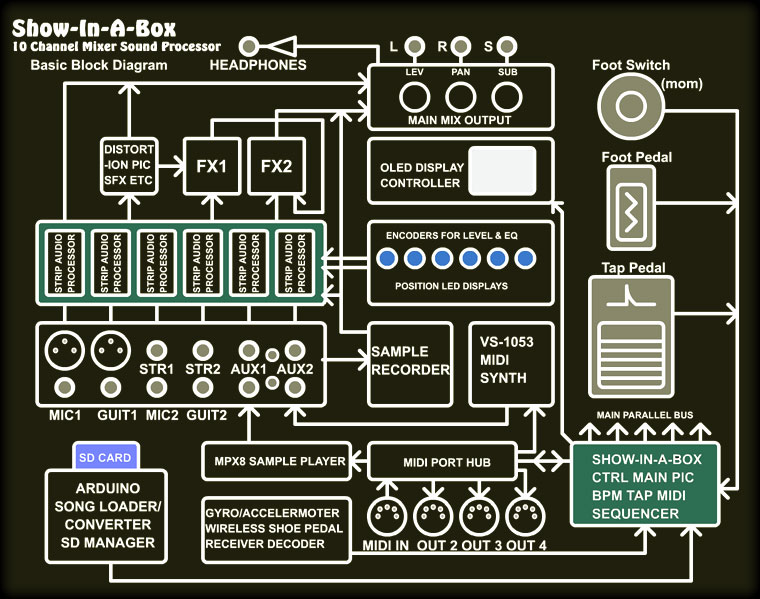
Besides easing setup (just plugging into an amp) Other
features will be:
At least 6 mixer
strips with Hi/Mid Tone Controls
XLR paralleled with 1/4" jacks pre-amped for Mic & Guitar
Master Output EQ at least 3 bands, variable centers/Q's
A "real" VU Meter on the output, so can level without amp
A Reverb FX (Stereo) on MIC & distortion/BPF Guitar
An Assignable (sel.sw.) Foot switch to control any panel element
Headphone socket (variable level)
Back-lit panel, virtual pots, Magnifier for Akai MPX8 Screen
MIDI File /
sequence
controllable everything!
Built in tap tempo sequencer/looper with multiple modes
SD Card reader for loading songs and saving settings.
A wireless "Shoe-Pedal" with accelerometer Tap sensing + + +
Oh! I forgot to
mention the new addition to my studio family. It's an Akai MX8 Sample Pad.
It's a nice little unit, has 8 pads, can load 8 samples of any length at
once, and uses an SD Card to store up to 500 sound files, from which
"kits" can be created. This is the ideal output for the cool (secret
still) sequencer I designed in October. It of course receives and sends
MIDI.
It does have a few bugs yet, but the first firmware upgrade has made it
stereo .wav compatible, which is awesome! I have already informed Akai of
their MIDI interface problem. It seems the unit doesn't recognize the
little known "MIDI Running Status". I have 2 different pieces of gear that
output it, so I imagine a lot of sequencers/DJ controllers etc also have
it. Big problem for Akai. Thankfully, if I want to connect the MPX8 to my
V-Drums, I can just put my (OMG! I Can't wait to unveil it!!) sequencer
inline between my V-Drums or Keyboards and the MPX8, and it fixes the problem, as it does recognize this format.
** If you are having problems making your hardware work with the MPX8, I
have a solution on my
MPX8 Page.
-Updated Jan 30
2014
Song File System
Now, at this
point, some organization has been added to the way the Songs & Loops will be
arranged on the SD Card that plugs in for loading. Basically it's:
Root Directory: SHOW-BOX.BIN: Contains default or updated Panel
Presets (10 of them) and Global Settings for the entire unit.
Then for each "song" (max 99):
SONG FOLDER: SongName.mid or loops.mid (up to 8 in a folder),
Song/Loop.TAP (created upon startup), and DirName.TXT which contains
filenames and Song info.
The song
folder can be a Long filename as I found out how to read those with an
Arduino, then the settings file dirName.TXT is a created 8.3 format from
that.
So the files listed in date/time order would be like:
The TAP files are created for a "fast load" of songs. The processing of
a .MID song into .TAP format takes 6-10 seconds, so things are sped up
considerably if the song is only processed once.
If there's only 1 Song in the folder, then it just needs to be loaded.
But for Loops as in the example, it's a bit more complex.
In order for
things to work well during loading, the Loops should be loaded in this
order. That way the set-up from the panel will be minimal. i.e. an Intro
will always be first, but if it wasn't, then it'd need to be assigned
that order if it is to be treated as an intro during playback. Keeping
in mind these are likely going to be exclusively drum loops, and that
the sequence will involve tapping a pedal to change from one to another,
it's important (IMHO) to get them in the right order to start.
I was going to
make them alphabetical, but then the loop's filenames would need to be
changed to 1***.mid which would suck.
So in order to load the directory, just copy them into a temp folder,
then drag and drop them in the proper order on to the SD Card.
DECODING MIDI FILES:
At
first glance .MID files seem incredibly complex. Most files now are type
1 (if there's more than one track) and can be extremely confusing to
look at (in hex) so at first I was a bit shy to take it on and almost
settled for just streaming the song recording the MIDI data to RAM, then
saving it to the SD Card as a sequenced file. Then I found that some guy
on youtube had built a MIDI player with an arduino, but wasn't divulging
any script or info, so it became a challenge! Now I had incentive hehe.
As I went along, I thought I had a good little "decoder" program (written
in Flash Actionscript to test) until I ran into this horrible MIDI file
it couldn't make heads nor tails out of. After some research I
discovered that MIDI files too can have running status, and really
disorganized and outlandish meta-commands (some with 40+ chars in them).
There were
tempo, time signature, and pitch changes! It changed my program
completely, and the way it gathered and dealt with data. Now I'm glad I
stumbled upon it, as now it can handle anything! I'll try to
explain how / why the MIDI files need to be converted to play on a
tap-tempo based sequencer:
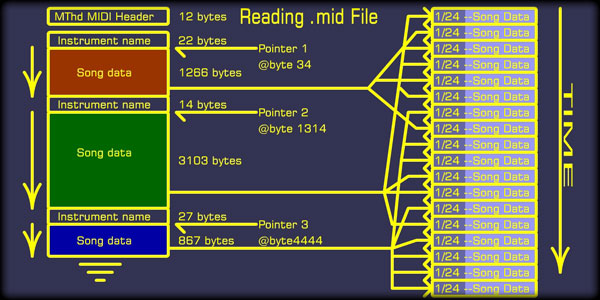
A
normal MIDI file (type 1) can contain many instruments, but I will limit
that to 16. 16 channels, or tracks, each with a different instrument on
it. Each any length (diagram left).
When a MIDI file is read, the first track and all of it's notes, control
changes, pitch wheel and program changes comes up first. Then the next
track and all it's notes etc. and the next.
As a result of this, the entire file must be scanned to get all of the
tracks, their starting positions in the file, and other data associated
with each track.
Then the song is played, and each note from each track comes up and
plays at it's proper time. How does it know when to play? you may ask.
Each note has a delta time in front of it that states:
Once this much more time has passed, play this note, then move on to the next.
This
is fine for a computer with lots of processing power, and lots of
memory, but inside of a little microcontroller things get complicated
really fast. I'm not saying the microprocessor can't do it in real time,
it can. If the song tempo is being described by the setting in the MIDI
file as the song unfolds. Delta times are predictable and the file
plays as intended.
In my design, the tempo must change on the fly,
and be in sync, so how does one quantize
where the delta times should be? Suddenly the processor is bogged down
with 16 pointers (4 bytes each), 16 x 3 buffers to hold data for running
status, and has to manage all of it's ports and communication as MIDI
comes into a port, and exits through others. Too much!!
Lets take a hardware break...
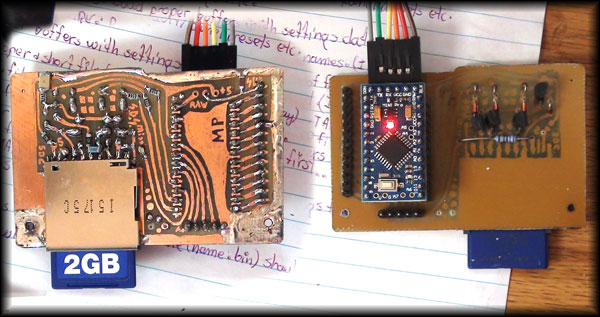
Here's
what the hand-drawn Arduino "shield" looks like. I don't have much
photo-board, and I can't wait around for more, so it's ugly but
functional. I have added a header for future I/O possibilties, but
so far, as I mantioned, the Arduino is just a slave port with the PC
and SD Card. I'm just so happy SDFat was written, kudos to you guy!
Free/Open source rulez too! Also I'm so happy I finally got into
Arduino. They're pretty easy, and in-circuit programming / comm on
the same port is already making me super lazy! The PIC's seem like
so much work now.
SD
Card:
The card socket has been stolen from my old computer as we've been
stranded on the island (the ferries shut down for 3 months) so I
couldn't even go to the dollar store over on the mainland, too much
trouble on the walk-on boat.
I tried speeding things up without a level shifter (which I also didn't
have) for the 5v to 3v change at the SD Card. Mine uses some
transistors, but it's only 1/4 speed with this card. Oh well who
cares, the bottle neck is in the USART's anyway.
The board
layout (as if it was to be photo-etched) is to the right for
reference. Wave mouse over it to make the labels show up better.
Most of the GPIO is on the header to the right, while all defined
ADC's are on their own header, for extra pots if needed. It's nice
to keep the options open some.
The RST,
reset pin will likely be used so the PIC can reset the Arduino, at
will, if there's an expected response but nothing's coming (error
trap) or for a re-load after file creation or SD Card change. If you
have a sharp eye, you may notice the SW pin on the SD socket isn't
hooked up yet, just a hole drilled. This will be connected to one of
the I/O pins to detect that a card is actually plugged in. If it
isn't, then the Arduino can send an error code instead. After a song
load, the SD Card can be removed to no ill affect, but if a new song
is requested, it won't be there to load. (It's probably in the PC
card reader getting a new song on it lol!)
If
you wish to giggle over the code, here's the
raw bin output
file .ino (115,200 baud to run it in terminal viewer) and
the easier-to-look-at
ascii names hex file. Of course you
need SDFAT and an SD Card with a .mid file in it to see the
.mid converted output at all. SOme example output is shown below.
There's 2
different LongFileNames functions, one does files while the other
does directory names. I found it easier to separate them as there's
still lots of program space left. Don't laugh too hard at my
inadequate "C" programming skills. I grew up with Basic and ASM/ML
languages hey.
Anyway,
back to the problem of sequencing a MIDI file without an 8 core Intel...
My
Solution: The Sequencer Theory
With every solution there's trade offs, and yes mine has a minor one.
About +/-10mS max timing inaccuracy. This seems like a lot, but it's
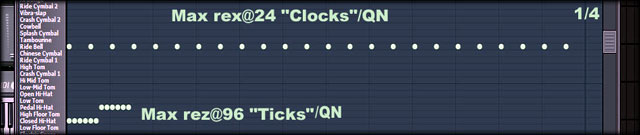
not, even with drums. I felt a bit guilty about that until I found out
that most sequencers resolution is only 1/96 of a quarter note, which is
4:1. Where it may be slightly noticeable is in a drum track
that was recorded. Some of the snare rolls may sound a bit choppy. Most
of my work will be produced inside a sequencer like FL Studio, so it's
not an issue at all. Besides, it's MIDI clocks sent are 1/24 of a quarter
note.
...so looking at this image, only 3 of the 12 close-together notes would
be sent, but this whole scale is a quarter note so it's small, about 5.2
ms @ 120 BPM. If it gets to be an issue, I may double/ triple it to 48
or 72, but this will increase the file size drastically, and the SRAM is
only 128K bytes. @96, a 4 minute song would consume 46k without any
notes!
I also need to add that most MIDI instrument's audio section will reach
max poly, (or whatever) start chopping audio, and sound bizarre, so fast
drum-rolls on MIDI are a tricky thing.
Anyway,
back to the actual solution! The program I wrote for the Arduino (my
first yay!) reads the MIDI file for each track as described above, then
sets file position pointers.
A set of up to 16 4 byte counters are also initiated. These are the
counters that will have the delta times of each "event" added to them.
These delta time steps are derived from how many ticks happen in a
certain amount of time, and are called PPQN's or pulses per quarter
note. The rest is too complex in this context so...
A Master counter starts and compares each track's added delta time
accumulation, and once greater or equal to one, reads it's note or event
data and sends it on to the main PIC chip.
It all happens pretty fast as the USART link in 115,200 baud. (probably
could be faster)
Now the data is being saved as if it were streaming from a MIDI player
right? This will be easy to sequence as playback as each note/event has
the MIDI channel included. Yay!!
The PIC chip (armed with a 1 Mb SRAM) sends back the data, with 24 F8's
per quarter note, to the Arduino which then creates a .tap file and
saves it to the SD Card.
fd is
bar1, beat1. ff 03 is followed by name and cr/lf
I think
this is pretty slick, and even though in it's infancy ( and not actually
tested on the sequencer end ) I think it'll do what I want it to.
Problems:
I
figured the track names could all be gathered and saved before
the song data was streamed. Wrongo! Thanks to that horrible MIDI file I
mentioned before, I discovered that sometimes the name might be
somewhere else, so forget about having a nice group of instrument names
with their channel attached ready to unload. So I left the "name" meta
code and sent them for the PIC to sort out. The names of the tracks are
important and I designated 16 chars each, which is probably enough on
the tiny display.
Another
issue I discovered with the nightmare.mid file was some programs
actually compose the file with "running status" ! As if things aren't
complicated enough already. This is where if a MIDI note, for example,
happens, then another MIDI note on the same channel happens, the channel
& type info is skipped and only the note# and velocity appears. Because
the channel & type info has it's bit 7 set, the other bytes can be
defined as running status. To further the mayhem (this tripped me up) is
the note-off code is also omitted, but is assumed if the note's velocity
is 0 !
This of course was easy to deal with once I knew what it was. Luckily I
have had recent experience with running status, so I suspected it right
away.
There's
a lot of weird (but logical) methods being used in a MIDI file to
minimize the size of the file, symptomatic of the 80's when it was
developed. Instead of making the delta times between events a 4 byte
binary number, they compressed it in a way that if the byte's bit 7 is
set, that means that another byte follows. If the next byte's bit 7=0,
then the previous byte, less it's bit 7 which is really just a flag,
must be shifted down into it to make it the final binary result. There
can be up to 4 of these! So looking at it is nearly impossible to derive
the number at all.
It is a brilliant scheme though I must say. The routine to decode those
is pretty simple, but try to wrap you head around it when it is
explained poorly! Ugg!
After a
while of monkeying about, I decided to add some beat markers in, mainly
0xFD to show a bar start, and a 0xFE to show a beat start. This will
make it easier to align beats in the final sequence. The 2 markers are
replaced by their F8's, so it'd be FD then 23 F8's FE etc. These won't be
sent out of course, but they did help me find another problem!
I created a really simple MIDI file that only had 1 bar with 4 beats.
Each note was exactly 1/4 note long. So, as expected, the sequence came
out as:
FD Note-on, 23xF8's, FE, Note-off, Note-on, 23xF8's...but at the end it
was 23xF8's, FD, Note-off ! (Above example is listing)
The note-off should happen before the next bar (FD) so why isn't it? I'm
probably overlooking something, but it's a big issue for loops and I'm
not sure how to fix it.
Other issues
are covered in the
Sequencer
section. One awsome but nasty problem is multiple MIDI CC's on each
channel and the increased Play-->Start delay they cause. FL Studio
demonstrates this problem spectacularly! If you have any sequencer (I'd
imagine), just try creating 10 instruments, then setting up CC's for FX,
Pitch Wheel, Program Change, Mod Wheel etc. Then hit the Play button and
you'll se a horrible delay. This CAN'T happen in a looping /
tempo matched sequencer, it just can't. I have devised a work-around /
compromise...
I'm quite
suprised how fast I learned to program the Arduino, especially with my
limited C knowledge. I will be listing a rough sketch, but don't laugh
too hard... after all IT WORKS!
For
more in-depth on how the sequencer will run, issues solved, and a .MID
file decoder sketch fragment , see
The
Sequencer
Disclaimer: This is not an
instructional page to build or manufacture the above project, nor are there
any guarantees of accuracy herein.
This page is an "of interest" discussion, and the project is intended for my
own personal use.
If you have any questions, or wish to pursue this project, you may contact
me (Sandra) at fresh(at)freshnelly.com