| Days 135 136 137 |
 |
Finishing fuel
tanks, coating with coal tar epoxy |
| Days 135 136 137 |
|
Finishing fuel
tanks, coating with coal tar epoxy |
| The process of
making the diesel tanks was such a tedious and messy task
that I wouldn't take the camera in for fear it would be
full of slag dust, so there weren't many photos of the
process! The sandblasting was quite a bit better than the last time because we used slag in place of silica. Mainly this was for visibilty, but it did make a very good pattern also. White-ish, with a sparkle. |
||
| We also
blasted out the sump area, the battery box area, Waste
water area, and trim ballast hatch cover. Coal tar epoxy was applied in all of these spaces. ( Top photo ) The order the diesel tanks
had to be painted was in three stages. |
 The forward side of the tank |
|
| The stainless waste water
tank will slide into the frame ahead of the tanks. This
was coated as well as the battery box, and the Trim cover
( for forward lead trimming ) The fittings on the diesel tank are for fill/ venting, fuel draw, fuel return, water draw ( from the deep sump at the bottom ) and level indicator. The level indicator is actually for a jeep, but modified to go much deeper. The float must go diagonally corner to corner to have room to rise and fall. It's plate is in the top left corner in the above photo. |
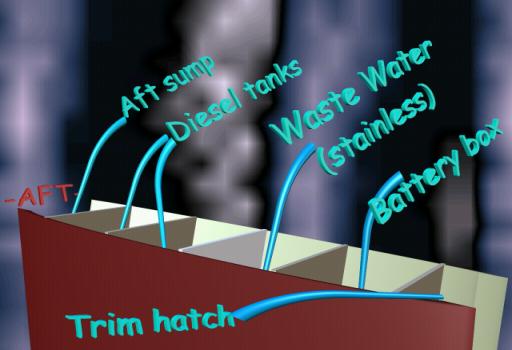 Here's the aft-most layout of the keel. |
|
| Just a note: This tank will hold about 75 Gallons, and we are going to add on two more smaller tanks port and starboard. Possibly a little day tank too! Nothing like contaminated fuel ruining all the filters! |
Day 135,136
&137:
19 hours total: Sandblasted, coal-tarred, and welded on fuel tank
covers. Tanks done at last!
Day 134 |
Revive that old radio! |
To Day 138 |