| Day 217 |
 |
Anchor Roller |
| Day 217 |
|
Anchor Roller |
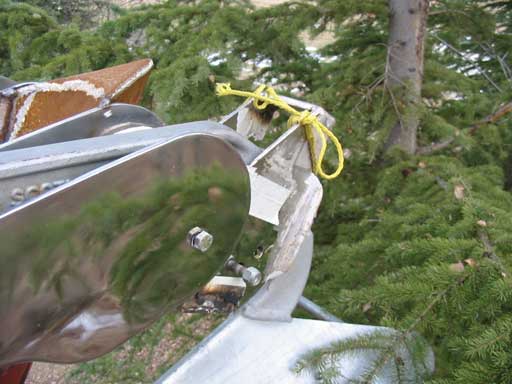
| I have protected the shiney finish in the pivoting anchor roller frame, but a lot of welding had to be done around it. The bootstrap can be seen across the top ( with the rope tied around it ) but hasn't got the adjuster on it yet. The flange that was welded along the forward lip can be also seen. | ||
| The lower
roller hole is being used in the above photo with the CQR
but there was sufficient room and bow clearance during
raising that the top one could have been used. The CQR was a tight fit!! It is snug on both sides once pulled in hard. The Bruce anchor ( right ) on the other hand went in nicely and will only fit with the roller on the lower hole. A block of wood is inserted in place of the adjuster. |
 The Big Bruce in place |
|
| We used the windlass,
mounted temporarily, with a car battery to haul the
anchors up. The 45º angle worked quite well with both anchors, barring the CQR getting caught in the tree on the first try. To the right is an animation of the pivoting roller unit, just to bring clarity. ( I just love animations! ) Our plans for the bowsprit is one that will go around all this, out further forward, and have a flip up deck to allow access to the roller assembly. A bowsprit isn't in the design, but they sure look cool ! |
||
|
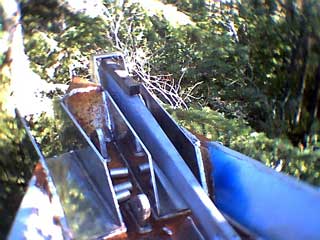
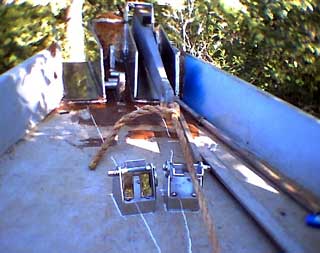
This is a good opportunity
to test the placement of the chain stops. We have
determined they will have to be cut down shorter in order
to be usable. They are designed to be bolted on, but you
know us with the welding. They'll be permanent. A bit of
thinking needs to be done as to how to "lock
down" the anchors. Origionally, we were going to put a vertical track along each run, with lots of holes in them. They would present a nasty tripping hazard and clutter up the deck in an already crowded area, so we may be re-thinking that. |
||
|
 |
||
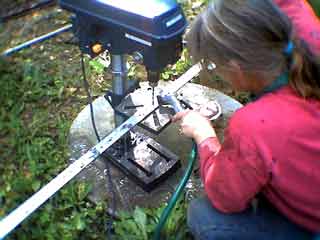
| While I was doing the
above, Gena was busy at work making the genoa tracks. (
right and above right ) They are very expensive and virtually unavailable used, so we are making our own. All they really are is a 1.5" flat bar on top of a 1" flatbar with a lot of holes in it. This will fit pretty much everything we have bought. Placement angle on deck is still under research. You may have noticed Gena holding a garden hose while drilling. This is to keep the bits cool while drilling and lengthened their life considerably. More than oil or anything else we have tryed. Stainless is pretty hard stuff, but as long as you don't push on the press too hard, and keep water flowing, the bit will last for 100 holes. Anyone trying this must be careful of water accumulation and electric cords. Just make sure the plug is elevated away from the ground! |
 |
| Blog: We took a week off this week, primarily to get some serious work done, and also because we needed a break. As luck would have it, we both came down with a flu. 7 of the nine days were spent doing a lot of nothing. This brings to mind the precautions that must be taken when abroad. Realising that we have both caught something once 3 days off shore on a crossing may be a bit of a nightmare. We wonder if people in high risk areas isolate themselves for a couple of days before leaving for a difficult crossing (ie Tonga ) Another good reason to belong to a regatta ? |
Day 217:
8 hours: Put together pivoting roller, tested anchors in it,
drilled genoa track
Day 216 |
Revive that old radio! |
To Day 218 |
