| Day 256 |
 |
Finished rudder,
winch mounts |
| Day 256 |
|
Finished rudder,
winch mounts |
| The last part of the rudder construction has finally been finished! It took 4 days but we're happy it's done, and that it looks awsome! | ||
| Gena took to
tacking in the port side rudder plate that I slotted
accurately for the plate to frame welds. Suprisingly, the
plate didn't warp at all! Probably because of the suttle
curve in it. We took the rudder into the machine shop to
get the flanges levelled and it turns out he had a
program that would calculate the curve of an aerofoil
based on length and width and section number. Wow! Timing
was a bit off there! I just drew it out and used a bent
peice of flatbar until it looked right. Probably not the
best method but it seems to have worked all the same. But
on the other hand, thank god we're not building a plane!
That would make the movie Flight of the Phoenix look like
a NASA moonshot hehe. The back of the rudder as shown is a 3/8" stainless rod. I figure this will reduce corrosion if the paint gets nicked there, as it always seems to on sharp edges.
|
 |
| All in all the
rudder went smoothly. We can't wait to get it back, prime
it, and mount it back up there. It kind of gives a more
finished look to the hull. Hopefully we'll have it back
by next weekend. |
|
   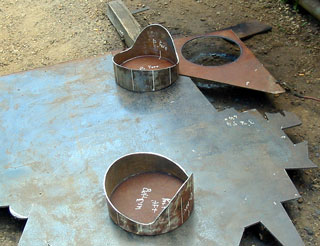 |
While Gena was
doing the finishing welding on the rudder, I was making
the 4 winch mounts for the biggest winches. These puppies
are huge! The mount is 11" diameter and the winches
are about 9". Because of the way we perceive the
pulleys will be lined up, the mounts need to be angled
outward. At first thought one would think this would look
goofy, but we've seen them at an angle and they look
cool! The trick is getting them to lean outward and at an angle without cutting out the coaming. Don't want to mess with the coaming structure. First I made a guide for the 11 x 1/8" pipe out of the trimmed piece of conduit Gena cut away for the wiring tray inside, ( See we keep everything! ) melted the ends and bent them up, then put a bolt through to tighen it like a giant hose clamp.( top photo left ) Then I cut off a 6.5" chunk and hauled it up on to the coaming with an angle of 18 degrees. In the second photo the lines are marked around the cylinder to provide alignment for a staight edge that will lay over the furthest-out side. A mark was made on the straight edge as this is the lowest cut edge. The mark was then used as a batten to make dots around the cylinder that, when completed, are joined together to get the shape of the coaming. The corner part was especially tricky as any slight variation of the straight edge away from the guide lines would move the dot considerably. A jig made to linearly track this shape would have been much better but then hey, whats a grinder for? I got lazy and tryed a different method for the third one. I noticed that the first one would fit perfectly where the third one was to go, opposite side, so I decided to use it as a pattern against the pipe.( 3rd photo ) This didn't work well at all. The old addage about a photocopy of a photocopy. Well it applies here too. It sorta fit, but not really. It ended up taking so much time to fix, I almost scrapped it! There is lots of left over pipe as we got it from our favorite scrap dealer, which brings up another topic: Dangerous chemicals! As I was cutting the pipe a peculiar smell came from within. The end was capped so I didn't notice it right away. It turned out to be full of sulpher and rust which ignited and smoked profusely! It's lucky that we live out of town and in the oil capital of Canada where sulphery smells are common! It made tons of stinky smoke, it must have been a furnace of some kind in it's previous life. I couldn't help but think "what if this were something more noxious?" So be careful especially with pipe. One never knows what passed through it before it ended up in the scrap yard. Happily I lived long enough to cut out the circles that would be the tops of the winch mounts. These will be mounted shortly. I hope the winch positioning
is ok. We haven't much experience with this shape of
boat, especially a steel one. It's hard to envision where
the sheets and halyards will be when the mast isn't
there, let alone the sails. We know how far back
(roughly) the forward pulleys need to be, but these
positions in relation to the next pulleys that lead to
the winch are compounded by any initial error. |
| Winch mounts | |
| We are on day 4 of our holidays and hope the next few days will be as productive! I, personally could keep going every day until the whole boat is done. Being this close to finishing has a real push factor. Tomorrow we go shopping for essentials. Not food but nuts, bolts, grinding disks, cut-off saw blades, tips, sanding disks etc. It'll be a holiday from our holiday. ;) | |
Blog: Today is day 256 which has some numerical significance. ie 2^8. 256 is in binary is impossible with only 8 bits ( as 255 is 11111111 or FF hexadecimal ) If we were all still using 8 bit computers we *may* have finished our project yesterday! Is my logic flawed? Anyway to our US friends we wish a happy July 4th independance day!
Day 256:
10 hours - Welded up the rudder and added the aft bar. Made up
four winch mounts.
To DAY $FF |
Tough
Radio Repair job?
Call Sandy's CB (780) 986-7433 |
To DAY 257+ |
