| Day 290 |
 |
Hatch prep Aft
Berth |
| Day 290 |
|
Hatch prep Aft
Berth |
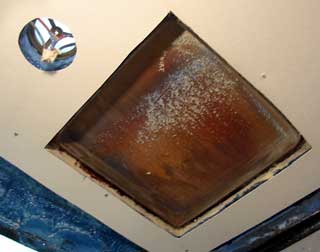
| After what seems like a very long space of time, Christmas visiting, a couple of flu bugs, and a difficult couple of weeks at work, we are finally back working on the boat! We missed it so much! To add insult to injury, the weather over the past 3 weeks has been amazingly warm! | ||||
| The temps of course fell off
to -15º now we're back at it. Even with that, returning the peaceful
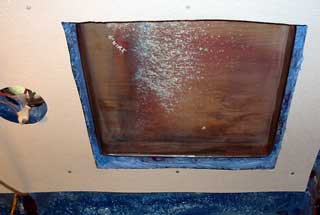
construction of the interior is a pleasure. My job today was to get the hatches prepared for framing. "Blue stuff" seems to have gotten all over all of them somehow. Because the bottom lip of stainless will be exposed along side the wood frames, it needed to be scraped, cleaned and polished. The inside stainless edge can be polished after, from the outside, once it has warmed up a bit. In the pilothouse, the original idea was to make the frames flush with the edges and support them with the "T" frames fore and aft. But this would mean the frames would need to be excessively wide on the aft end so that idea has been scrapped. Now the foam must be cut out around the hatch to accommodate the wood framing. (Top right) Blue stuff was carefully painted back on to the foam afterwards. While wet, it can be removed with a wet rag. I used a beveled sanding disk on the grinder, then a 60 grit sanding cylinder on the drill to polish up the bottom edge. |
|
|||
I call it a cylinder but
really it's like a fan with little blades made of sandpaper. 60 grit
means nothing with these things! Because the sandpaper slowly gets
exposed as the cylinder becomes smaller, scratches don't occur and it
can be used to polish to near a cutting polish shine! Really!
We have a unique idea about how to pursue
the design of the berth. |
||||
| The problem of mildew on a boat is ever
present. It starts under mattresses and seat covers then leaches into
the foam making a terrible small that is impossible to evacuate once
started. Normally, large holes are cut out of the plywood to allow for
ventilation, thus alleviating mold build up between airing times. Unfortunately this doesn't work 100%. Eventually, the mattress doesn't get aired in time and the mildew starts, leading to replacement of the foam. Our solution is to use an air mattress! We both use them now and they are quite comfortable. Ours have lasted well over a year and only need a couple of lung-fulls of air every 3 months or so. The Coleman type seem best for a midrange price. |
|
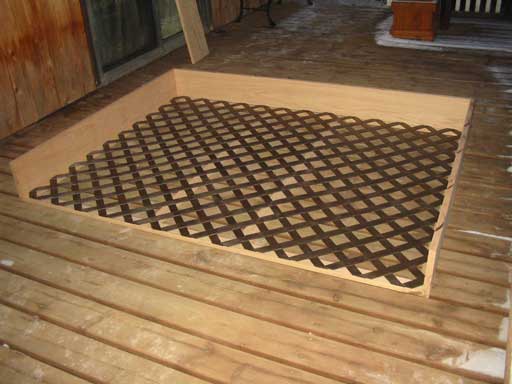
| The next weapon in the battle
against mildew is to NOT use wood and have plenty of air holes. ( in
case we decide after a while to use a foam mattress ) Plastic lattice ( The kind you use around a deck or for partitioning a garden etc ) seemed to be the ideal solution. The top photo shows how well it fits in. The center supports are needed because based on our experiences, this type of plastic will stretch over time if too much weight is on it. |
|
| Another advantage to using
plastic over ply is the weight factor. The whole berth will flip up on
hinges to access a rather large area underneath so should be light to be
manageable. The framing around it it 7/8" rough cut oak ( which will of
course be smoothed ) and will have a face and top rail ( actually
an oak handrail ) to make it easier to get up on to. Tomorrow it goes in ! |
|
Day 290:
7 hours: Prepared for hatch framing. ( 5 hatches ) made aft double berth frame,
put in pressure pump mount
To DAY 289 |
 Fresh Nelly's new CD Comic Books Now available @ CDBaby Soon at i-Tunes |
To DAY 291 |
|
|