| Day 293 |
 |
Base for
cupboards, aft hatch |
| Day 293 |
|
Base for
cupboards, aft hatch |
| Gena hummed and hawed about the base of the cupboards that will be on each side of the large berth. At first the idea was to sink it down low, but it curves in so much that not much space would be added. Also the depth may be a problem for reaching small objects thought to be missing that have rolled off into a deep dark corner down there! | ||
|
The easy and
simple solution was to bring it up to the frame and build on top of it.
( yay! ) The above photo shows it in place. It had to be battened in for
the curve. The accuracy is important as small objects may find their way
through any cracks. Silicone will be added as creak proofing, as well as
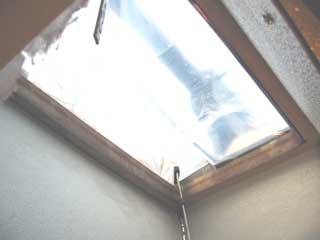
stiffening. My job was the aft hatch framing. It's a sky light really, but still needs some framing to hide the ugly primer and blue stuff around the stainless. Some trimmed off base board fit the bill. I offset it with some 1/4" scrap wood, glued into place, then hammered in the frame as it was tight. |
|
 |
The clamps are to hold it in place
until the glue dries. Around the bottom of the opening there are two little shelves and 2 sides that run straight down. 7/8" oak was used to face the shelves. This will be a great base for a couple of little spindle rails. I thonk it will look cool! I plan to perhaps put some little plants, real or not, up on the shelves. It's a bright area. This flat sides are a bit of a decision. 1/4" moulding of any kind isn't wide enough to match the piece I have put in. I will need to route something down as all we can get is 7/8" . I couldn't finish because we started late. The two pilot house hatches are shown below. |
|

Day 293:
5 hours:
Put in pilothouse hatch frames, base for cupboards aft, started aft hatch.
To DAY 292 |
 Sales, Service, Installation |
To DAY 294 |