| Day 300 |
 |
Little doors Vanity |
| The temperature outside is very cold, -20º or so, so it took a long time for the boat to heat up to comfortable. All the same we managed to get in over 5 hours of work today before the tummy grumbles started. |

|
The photo above shows what I
was up to. Routing out nice corners is a strenuous task. To add to the
difficulty, the gate for the router , which has never been used, was
coated with some kind of paint that stuck to the wood making it drag
hard. This led to mistakes drifting off the line etc. Luckily I had
decided to start them oversize as the plunge cut is always the hardest.
After that I trimmed them in to size.
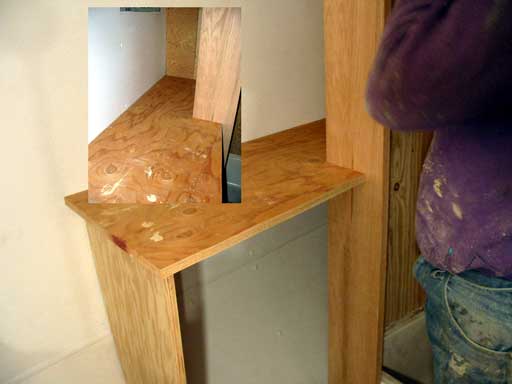
The very small doors are finished in the center with a roman curve type of bit. The outer edges will be rounded in but will just be basic as only 3/8" can be left after the seating cut. This will allow about 1/2" overlap for the latch. The hinges will need to be sunk in by 1/8" to seat properly. The right kind of latch is difficult to find. We have searched all over and not found anything that will work and look good. Most cupboard latches are snap or ball/spring style. No good for a boat as they could pop open dumping the contents on the crew. There won't be any bowling balls up there but a bottle of rum or even a shortwave radio could cause serious injury if it flew out hard enough. I have designed a simple latch that may work. ( Top left ) It is a rod that slides in a hole with a spring on the end. The rod is drilled and tapped to accept a screw with the head chopped off and the handle is screwed on to that. Pretty simple really. Oak is strong enough that this would work. So if all else fails, these will be it. I do love those fancy brass knobs! Gena was asking my opinion on where the vanity in the head aft should be. I think the face should be even with the hull as there will be a mirror there and it will look "even". The height we decided is 3" higher than usual so small children would need to climb up on the toilet mount to use the sink. That's ok! It always seems to me , especially when washing my face, that those vanities are way too low. In the photo to the left, a vertical plank encompasses the tub. The folding door for the enclosure will tuck in behind this nicely when not in use. Some of the angles involved in this area were a challenge for Gena, but she did a fine job of making everything fit! |
| Looking down the counter behind the
enclosure (photo right) one can see there is some depth. This will be a
good place to store rolls and paper towels etc. You may have noticed in
the above photo that a port light is being sort of blocked off by
the enclosure. It's not a problem as we plan to put a translucent window
into the enclosure allowing light to come in there.
The vanity area already has plenty with another port light being there.
|
 View in inset shows deep storage area. |
| I will finish the doors tomorrow. Wish me luck! | |
Day 300:
6 hours - Vanity construction, cut out doors to make pretty!