| Day 307 |
 |
Rudder Hydraulics |
| Day 307 |
|
Rudder Hydraulics |
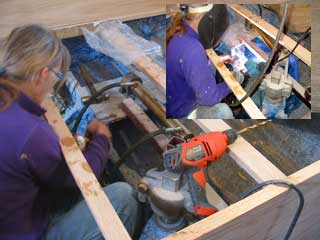
| Gena's long awaited project of
installing the hydraulic system for the rudder has began. The pipes show
in the photo above are high strength 5/8" and have a peak pressure
rating of 3500 psi. Because they need to be bent in place, we had to
rent a 5/8" pipe bender for the job. It was very tight to get into tight
places with this big tool!
|
||
|
Laying in pipe through a
finished area of the boat is a tall order. We thought we would be using
hose originally but the runs are too long and hose allows for too much
expansion or envelope. Short hoses to the cylinder are the only place
there will be any in this system. Alignment of the lines is crucial. Gena has way more patience with this sort of thing than I do! The whole thing is fairly complicated (and expensive ) at best. Just the double acting pressure releif valve, which effectively opens either way if the pressure gets above 900 psi, alone cost about 900$! ( It can be seen in the top photo bottom right inset, the white thing ) The system as a whole is depicted at the bottom of the page. The fill must be higher than the rest of the system and goes via a small hose from one pump to the next. We have been thinking on putting a filter under the fill as contaminants in the oil can chew up seals and be very costly! Before connection, all lines must be blown out to ensure nothing stays in the pipes.
|
|
| The steps going aft and forward were my
job for the day. ( Look! An actual photo of me doing something! ) Not a
lot of thought was given on where or how to mount the steps here. When
welding in frames one just thinks " we'll just weld on some tabs there"
but not an easy thing to do after the interior is in!
There will need to be 2 brackets welded in
going forward as those steps need to flip up to access the waste tank
and whatever else is going to be under there. The steps there will also need to be boxed in behind to hide the ugliness of endless pipes, valves and fittings associated with the tank. The tops have been made round for just that reason. The aft steps are to be mounted solidly and left open. ( Photo right ) The small cupboard on the end of Genas' desk will need to be a flip up/in style or sliding. The drawer above will clear no problem. The headroom when exiting the aft is terrible and is a real head banger. ( I hit mine twice before I decided to put some Styrofoam across it to soften the blow!) |
 Screwing and gluing
|
||
| We should have cut into the coaming and slanted the entryway up toward the top of the coaming to allow more room there. I thought the steps would alleviate the problem but still we bang our heads. A soft bumper may be in order for the top of the door. That way it won't hurt so much! | |||
|
|||

Day 307:
7 hours - Made steps fore and aft
|
|
|
|||


