| Day 311 |
 |
Watersys& doors/drawers |
| Day 311 |
|
Watersys& doors/drawers |
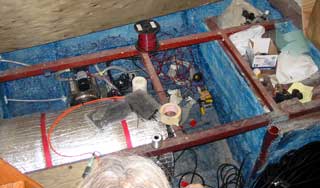
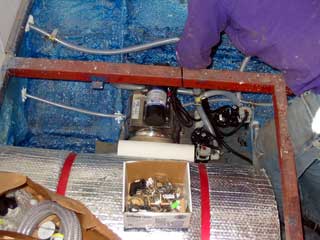
| Every yacht needs a water system for washing, dishes, showers, cleaning the anchor chain, and of course the head. Some systems are exclusively hand pump style. They consume zero power and are reliable. They are self priming so water line angles aren't important ( except in long runs! ) and only require some patience while operating because they're not the fastest flow, certainly nowhere near what we're used to in a home system. | |||||||
  |
A pressurized system on the other hand is
easy to operate, requires minimum effort, and gives a more home-ish feel
to the boat. The electrical power requirements are a down side to a
pressurized system, so we have incorporated both systems. For a little water, the hand pumps can be used. This will prevent the pressure pump from kicking in for a glass of water. If one needs to fill the sink for dishes or rinsing clothes the electric system can be used. ( Filling a sink with a hand pump can take a while!! ) Also, we will require hot water from time to time. Hand pumps from hot water would be a very time consuming task not to mention the hands pumps probably don't like hot water much. Gena has taken on the task of plumbing for the boat. Shown in the picture is the beginning of a fairly complicated christmas tree of pipes, hoses, valves, pumps, and tanks. This part of the water system is the fresh water system. |
||||||
| Because there are two tanks,
and it will be necessary to switch the watermaker from one to the other,
the valves are in place to allow remote controlled pumping of water from
one tank to the other, as well as powerless equalizing between the two
tanks. Obtaining the valves was a bit of a trick, see blog below. With the system their are several scenarios: |
|||||||
|
|||||||
| Once the valve has opened, much less
current is required to keep it there, just like holding two magnets near
each other. Much more pull is required to separate them once they are
together. The capacitor is of high enough value to provide the big initial surge for a few milliseconds while the resistor provides enough current to hold the valve open. Enough said! Monitoring the water system is crucial, especially for a system like this. Outside of needing to flip up the engine hatch and shine a flashlight on the opposite side of the tank to see the level ( been there, done that! ) an electronic monitor is required for both tanks. In the photo to the right one can see these cool little sensors on the tank. They are not to be used on steel tanks as they won't work. I'm not really sure how they do work but I bet it's something to do with magnetics or Very Low Frequency RF. Who cares, as long as it works! The panel location is still being debated, but probably where the tank control switches will be would be a good location. The dash board is getting pretty crowded!
|
 Power saver! 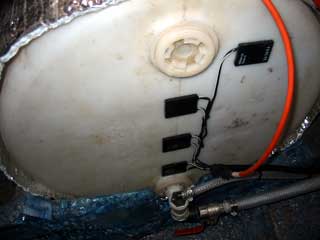 |
||||||
| As soon as I have time, I will make a drawing of the entire water system, including the waste system and watermaker, to better show how it all works! | |||||||
 |
|||||||
| The big photo above shows Genas desk taking shape. I completed the drawer faces, and the bigger ( heavier ) ones have been deeply routed out from behind to make them much lighter. The centers, where the latch will be, were left full thickness. The latches I will install at work during any slow moments as I did with the aft cupboards. Same knobs as Gena loves 'em! On the far left you may have noticed the door flipped out touching the little ladder. I made a "hinge" of sorts that just hooks over the frame so it can be removed. That cupboard is quite deep and the way it is there makes most of it inaccessable. ( Unless you have the arms of a monkey! ) | |
| Going forward into the galley, the steps must flip up to access the waste tank connections and some storage under there. As an afterthought, two SS tabs needed to be welded on. ( Photo right ) This was a risky affair as everything is covered with saw dust and under that rubber blue stuff. I put the leather coat under the area and shielded everything but still a little fire started which I promptly put out. The sawdust was acting as a wick and the rubber coat as a fuel. I watched it burn for a few seconds like a little candle. Made me nervous! |  Temporary screw holds ladder in place |
 |
By itself the blue stuff won't
burn, so we must clean the sawdust off more regularly. It's a real hazard! The ladder can now flip up! The back will have some whit panel attached eventually to hide the ugly conglomerate of pipes and connections underneath. |
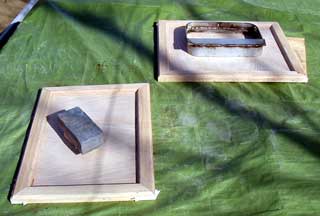
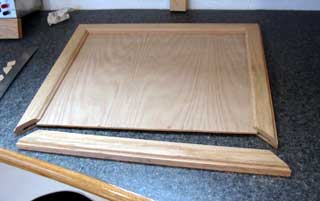
| The last 2 photos on this very long page show the 2 cupboard doors for my desk. This time I just cut slots in the 45º corners then hammered in four 1/4" blocks to connect it all together. It worked like a charm and the alignment is perfect! Much easier this way. | |
 |
 |
Blog:
Obtaining the valves for the intake side was a frustrating and
expensive experience. As we have never done this before we are at the will and
whim of suppliers and scanty specs on these devices. Most of the equipment we
have purchased for the boat we have found on the internet, but, because of the
nature of electric valves and never having owned a sprinkler system, selection
was difficult. We thought they were all basically the same. A solenoid opens
when powered. Period.
We soon found out that all of these need/require water pressure to be opened
after they were delivered. The last pair we ordered, we explicitly asked the
supplier on the telephone if the valves they were selling required pressure to
operate. "Oh not at all" he reassured us. They arrived 2 weeks later. They did
require pressure. 2 more to throw into the collection box with all the others.
One day Gena was wandering
through the local Co-op store, a farm supplier/hardware /lumber store. She asked
if they had any 12 volt electric valves that don't require pressure to actuate.
He answered "oh yes, for irrigation systems" She thought, oh yeah here we go
again....
They were exactly what we had envisioned, a big coil with a plunger that comes
down into a pipe fitting. YAY!!
They are fairly expensive, about
$80 each, but they will do the job. Sometimes locally shopping can be better
than all the expanse of the world wide web.....go figure,
For anyone that is looking for the same thing, they are the white metal things
with the red circle on top in the top of page photo. The black round things next
to them are the sprinkler valves, of which we have many. Oh well at least we'll
have back ups!
-------------- Addendum
----------- March 2008:
As we are getting ready to launch, a check of the water system is
in order. Gena wired in the swicthes for the intake and the pressure solenoids
and turned the pressure ones on. Suddenly I smelled smoke. We frantically
searched for the source and turned of breakers. Lo and behold, it was one of the
damned pressure solenoids! For some reason, 12 volts doesn't agree with it for
more than a few seconds. We were not happy, as removing these and putting in the
other style is going to be a major job!
They are probably rigged for a
pulsing system or who knows. Thanks whoever you are that supplied them to us.
Thanks a lot!
The whole box mentioned above is going into the garbage, and we're going to get
2 more $80 irrigation valves.
Don't ever use these things in a boat people. They are dangerous.
Day 312:
8 hours - Installed bulk of fresh water system, faced remaining drawers, made 2
cupboard doors.
To DAY 310 |
 Announcement! Our toilet is a Jabsco! |
To DAY 312+ |
|