| Day 324 |
 |
Polishing smoothing |
| Day 324 |
|
Polishing smoothing |
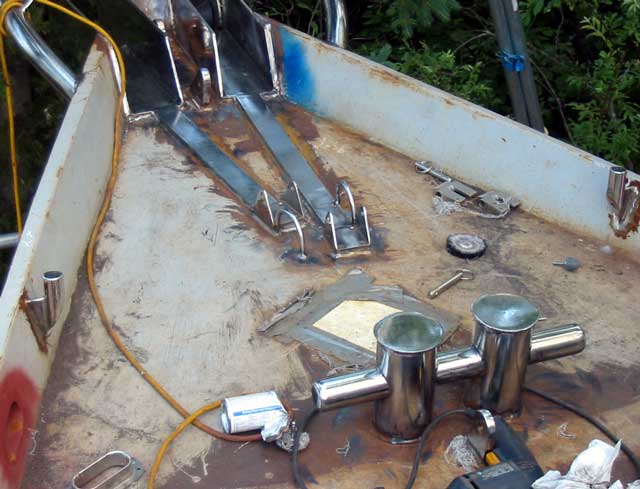
| Above, the photo shows everything getting nice and shiny! The Samson post that was used long ago on some yacht, somewhere, had never been polished so I had to remove the mill-scale first. It was a lot of work, more than I had planned for, but doesn't it look sweet? The chain tracks are just buffed because the chains will have them scarred up in no time. The forward most chainplate, the one between the anchor roller assembies, was the most difficult to polish up. I should have polished it before it even went in. | ||||
 |
I must remember that when we build our
next boat.. Ya right! All of the hatches and "holes" in the boat will need to be covered for sandblasting. Gena cut out the plywood covers to an exact fit to allow masking tape to be put on over the lips, as well as stop sand from getting inside.
|
|||
| I hope the neighbors don't
think the swatches are an attempt at painting the boat! "We thought one
can of spray-paint would do it, but looks like we'll need more!" More on that soon enough. The hatches aft in the coaming all need to be blocked off from sand spray. There will be a lot of masking tape used, and it can't stay on too long as it will separate and leave sticky stuff ( that is very difficult to remove ) all over everything. This is from experience lol. |
 View from cockpit. All hatches must be removed |
| The two stainless coaming hatches may be polished or "brushed" or painted. It all depends on how the sun reflects off of them and whether it blinds the crew. (us) | |
 |
After all these years, our little
white grinder finally gave up the ghost. Seems the brushes are worn out but
being cheap, it has no way of replacing them like a better Makita grinder
for example. Problem is, we seem to have lost our other little grinder and I
need to have two to save switching from buffing pad to grinding disk
continually. They are not the right size for this grinder shaft so centering
is required, taking more time. I guess we'll need to break out the new one. The one we were saving for keeping on the boat for emergencies. |
| BLOG: While we're on the subject: Tools are getting to be of much worse quality now than when we first began the boat. These new "chuckless key" type drills are the most annoying! Especially with a hole saw. Even with 1/4" steel bits they are useless. We resorted to tightening the chuckless with pliers or grinding a "key" into the bits. Then the keys threads strip or the bite disappears. Eventually they are useless. We have several drills that are like this....useless. The other day we went and bought an expensive 1/2" drill that still had a "real" chuck. One of only 2 of perhaps 25 types of drills they had that actually had chucks. Very annoying. Another thing was the jigsaw. Both of those cooked up so we went and bought a new one. Sometime in the recent years the blades have all changed to a new style. You can't get a jigsaw that uses the "old" style blades so all of the blades ( we bought tons of them! ) -that still are stocking 90% of the blade shelf section -are useless to us. Maybe we're just getting old but what was wrong with jigsaws before?? 30 years before?? |
|
Day 324:
8 hours - Grinding Polishing cut hatch covers Toasted cheap grinder
Marine Radios Sandy's CB Shoppe |
