| Day 386 |
 |
Lighting, inverter,
diverter |
| Day 386 |
|
Lighting, inverter,
diverter |
| Lighting on a sail boat in the
past has gone from torches to candles to oil lanterns then incandescent
bulbs. Up until recently, bulbs and fluorescents have ruled the waters
for the last 40 years. They need to be replaced often if used regularly,
consume lots of precious battery juice, and tend to melt their plastic
housings for some reason if used every day in hot climates.
I know this from living in an RV for a number of years. Quite simply, they are a pain! Mini fluorescents last longer but make radio noise, and emit an unpleasant light pulsing at 60 hertz which, quite frankly, gives me a headache! Imagine the revelation I ( and millions of others to be sure ) felt from the evolution of the common LED into a high power white light bulb that consumes only 1/5 of the battery power for the same candle power! |
|
| Because High power Flux LEDs
are new, they are prohibitively expensive in North America. Standard
bulb replacement types are "insufficient" light in my opinion as the
candles per square inch of an incandescent element is far beyond that of
a group of LEDs. With their standard plastic cases, one simply can't
pack enough of them into a small space the size of a little bulb.
Further evolution is required. Until then, we will need to find a way around this. |
 |
| Completely
removing the bulb socket and making custom boards to fit ceiling
fixtures is the solution. The strange photo to the right is one of these
layouts I drafted in Macromedia Flash ( although it could have been done
in Photoshop or a proper PC board CAD program, -bad habits!) that will
be duplicated and photo-etched on to a positive resist copper PC board .
The 4 pinned flux LEDs will be soldered on to the pads to mount. This
light will be much brighter than the incandescent original, but has a
dimmer position. For more technical info on how this all works ( and so I don't clog this page up too much for you non-tekkies! ) go to the lighting page. Another major issue is the price of these things. I ordered some Flux white LEDS from a company in the US a while back to do some experimenting. The light bar I made needed 30 LEDs to satisfy Genas "good light" requirement, and yes it worked well. The bad part was the LEDs were about $1.10 US each x 30 that's $33 US for one bar of light. We need about 500-600 min. of these LEDs to light everything the way we want. This translates to $800+ CAD not including boards to mount them on etc. I searched and searched for cheaper LEDs to no avail. A couple of weeks ago, China came to mind so I googled "Hi-Flux LEDs China" and hebeiltd.com.cn, a Chinese manufacturer came up. Their prices on the exact same LEDs were 1/5- 1/8 the US prices. I figured it might be one of those "scam sites" as it seemed impossible that the prices could be so low. I searched for other's opinions, and some agree with me. I made the order anyway (about 1000 LEDs plus 15 light bars and some MR-16 LED bulbs) that came to about $350 CAD. I figured this out to be around $1500 if purchased on this continent. They were friendly and courteous to deal
with, and 2 weeks later my order arrived! Much to my relief. The LEDs
are of excellent quality, don't vary much from one to the next, and were
well packaged. The light bars were a little disappointing as they
appeared to be in cases but were actually just the open "strip" style.
Not an issue for us as we have a solution for that. (See day 387). All
in all, I wish to tell everyone that China is the way to go with LEDs,
and I recommend these guys for now, and the future. |
|
 |
Some of these photos show work
carried out during 'slow' times at the shop. The hours aren't really counted
at the bottom of the page because, to be honest, I couldn't add them up very
accurately anyway. The Xantrec inverter/charger unit comes with wires for the 100VAC in/out, but they recommend breakers on these lines. I find it rather silly that the things weren't already in the unit but ok whatever. Gena made a plate to cover the large gaping hole these connections come from and mounted a couple of switch style breakers in it. The 2 round holes are for the cable after it passes through the breakers and standard through hole breaker box wire clamps. Where's the plate? Where's the breakers? Hmmm. |
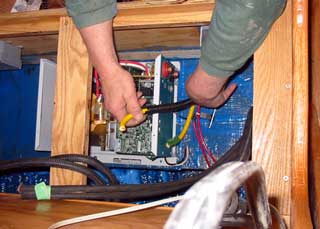 |
Wiring the Xantrec in under the
aft dining seat took her the better part of the morning as all of the heavy
cables needed end soldered on and sealed.
Cables and wiring to the load diverter also needed to be connected. The load diverter is a battery monitoring box that senses when the batteries are getting overcharged and switches in a "load resistor" to divert current away. Our "resistor" is the hot water heater. The 120VAC element has been substituted for a 12 volt element. We have added a loud piezo beeper across the water heater's thermostat so if the water ever gets hot enough, the beeper will sound when the thermal switch opens. This will be useful if we are intentionally heating the heater manually for a bath or shower as a ready beeper. :)) |
 Load diverter to the left, Xantrac inverter/charger to the right. |
|
| I must congratulate Gena on organizing this wiring nightmare into order from chaos. It looks complicated because it is! Soon, I will be posting a wiring diagram to clarify all of this, but that in itself will take some time and effort! | |
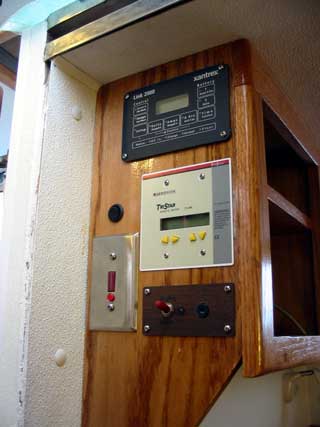
| The cutouts I made a couple of
days ago were filled with their appropriate panels today. The Xantrec
control panel, TriStar diverter panel, bilge pump panel, and my sewage level
indicator panel all look good here. Pretty crowded! The round switch is for
illumination of the Xantrec panel. They somehow forgot to add a switch for
that! (Maybe they ran out of room on the panel?)
|
  |
| With all of the
wiring, panels, controls etc. never having been tested as well as other
sailors experiences with "out of the box" marine electronics, I must admit
we are pretty nervous about all of this stuff. Some of it we purchased a
while back and is already off the warranty period. Eeek! Very soon we will find out as Gena ordered a shore power plug to 120 VAC plug adapter. We're still going with a battery charger for the European (and rest of the world!) 240VAC power for now. That corner of the little cabinet will be cordoned off with a pushed in piece of FG panel to protect the wiring from contents. Apart from drilling, cutting holes for the lighting up front, (top of page image: a standard automotive light purchased from Princess Auto with a custom cut oak board inserted where the sun visors would normally be!) I made the special shelf for the locker on the left side of my desk. |
|
| This is the one that has the
exposure light for PC boards, which I need to use shortly to expose the LED
boards so has priority. The center Of the shelf has a slide rail added on
and routed to a 1/4" slot. A small width of oak board routed down on the
edges to 1/4" fits into the slot making a flush surface at the 1/2" shelf
height. I glued nylon tie-wraps to the ends to make it stiff to pull out,
then some oil and wax to keep it from seizing.
Sounds awfully technical doesn't it? It's one of those things a person comes up with after giving it much thought! Seems to work fine anyway. |
 |
The round hole is to hold the
120VAC cable that comes off the light when not in use. The whole locker can
be used for other things when I'm not exposing PC boards. Cool hey? Lastly, during spare time at work, I managed to make the cover window for the DVD player box. The gasket will add another layer of protection from salt air corrosion. Am I going to far? Probably! I just love that little player though, I want to protect it like a lioness would protect her young. It'll be like a cute stereo system glass door! |
 |
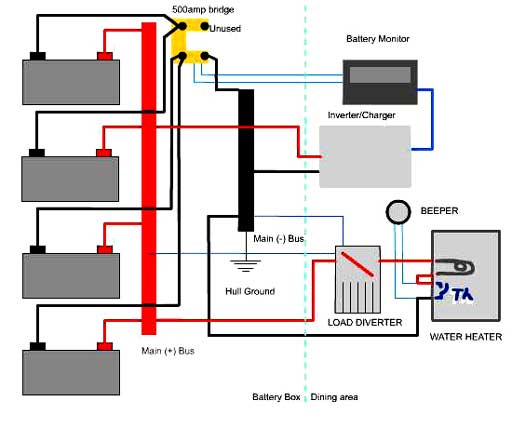
| The mains system is depicted in
the diagram to the right. Sorry about not including the other 40 circuits
that come off of this. It's just a basic idea of how the system works as
mentioned above. I really would like to have a full drawing of all of the electrical systems finished. I'm accustomed to that being a radio tech ;) Perhaps an interactive diagram like the one on Alien 2 or on Star Trek would be cool. The cruising life is definitely for me! Lots of spare time! |
 |
welcome to
www.thebigsailboatproject.com
Day 386:
9 hours (+/-) - Cut out galley/dining and forward stateroom ceilings for lights,
made shelf, installed inverter and load diverter
to DAY 385 |
Fresh Nelly Musik |
to Days 387+ (on new host) |