| Day 390 |
 |
Trouble in battery box /stove
hood |
| Day 390 |
|
Trouble in battery box /stove
hood |
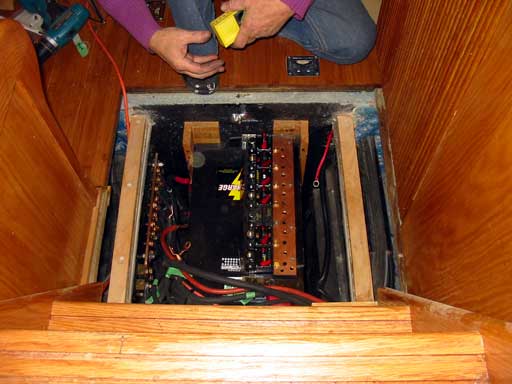
| No, I'm not repeating an
earlier day on the battery box, or forgetting that I posted those photos
already... Gena was tightening the nuts on the breakers as a final touch before putting on the seal gasket and one of the nuts was stripped! Not the threads but the "plate" inside the breaker. It was pretty much hooped. |
|
| After that, she realized the
whole bus would need to come out because the batteries were in the way
too much to get a wrench in there to replace it. As a result she decided
to remount the whole thing on top of the batteries for easier access in
case this happens again. She made a bracket and attached it to the wood
frames, then attached that to the bus mount. It took her pretty much all day to complete but now the access is easier for inspection and replacing any bad breakers. Some of the wire needed to be pulled back ( not an easy thing to do when everything is to the inch! ) and rearranged. In the photo top right the "resistor" for the battery monitor is visible. The fins are cut at the right thickness and width and length to allow a predictable voltage drop to result. The sensor wires carry an extremely small amount of amperage and voltage to be read by the monitor. If this bridge was .01 ohms, ( 100 mhos ) 100 amps would deliver 1/100th of 12volts or .12 volts. This bridge is rated at 500A per side so it could be even lower. The monitor can sense amperage much less but who knows how much less. Guess we'll just need to trust that! Upon firing everything up, we noticed the batteries weren't charging ( via the monitor display ) and figured something must be wrong with the Xantrac charger. OH NO we thought. After a few minutes we realized the breaker for the inverter was off, which is also the path to charge the batteries. DUH!!
Anyway, it is all working and we have reading lights, 12 volt microwave oven and power up front plus inverter power. Everything works!! Soon we'll just move in. ( That way I'll g et away with not cleaning up the house lol! ) |
 Remounted breaker bus  |
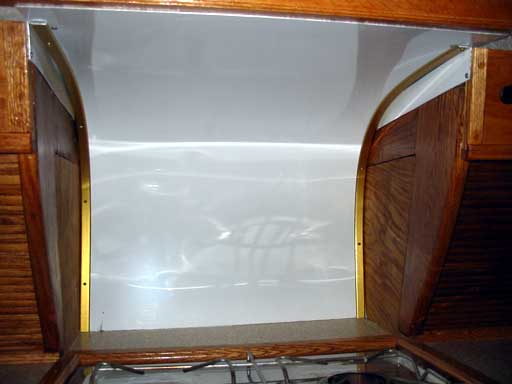
| One of my little jobs to do today was get a "hood" in over the stove. I've never really cooked inside a boat on the ocean ( have on lakes but that's not the same ) and I'm not sure how much moisture hangs around while cooking. I do know that constant steam can cause damage to wood and condenses into water when meeting something cooler than the ambient air temperature. As this is an alcohol stove, it has moisture coming off the burner as well...we have been warned :) | |
 This is why I decided we should have a metal hood over the stove that will protect the wood work and allow condensation in a predictable way. The white panel is made from enameled aluminum sheet we acquired from a friend who hauls aluminum scrap. The theory is that the aluminum will be cooler than the surrounding air heated by the flame on the stovetop which will cause some condensation to occur at first. This will run off harmlessly on to the counter top where it can be wiped off. The remaining steam will rise to the ceiling where it can be drawn off out the only hatch with a fan that draws instead of blowing in.
|
|
| Round curved scraps of oak fit to size were used to screw it to. The aluminum was quite heavy so resisted the bend quite a bit. I ran a conduit behind as there will be some wires going through here to the dash for my home-made CAT interface remote control head for the ham radio. ( Looking forward to making that! ) After a little trim it looks pretty useful. Even if it doesn't work the way I think it should, it at least is a nice finish to the stove. |
Day 390:
7 hours - Fixed battery box, made a stove hood
To DAY 389 |
Follow
Soccer France with TV5.ca In French and English! |
To DAY 391 |