| Day 403 |
 |
Motormounts
latches, Radios |
| Day 403 |
|
Motormounts
latches, Radios |
| After all the designing and work I did way back when we first hauled the engine into the boat, Gena has discovered that, with the motor mounts ( the things with rubber inbetween ) leave the engine too high. She is redrilling the aft mounts, and scrapping the forward mounts in lieu of the mounts on the parts engine. Arrg!!! | |
 |
Never think a job is done when it comes to
boat building! She has spent most of the day working on this alignment
problem and still it's not solved. It turns out that the other mounts
need to be modified to get the engine in line with the prop shaft. A
dial gauge will be used for final alignment but first the bolts need to
line up. I'll get a paragraph from Gena on how that fine alignment is done as I am a babbling idiot in such topics. Better stay quiet and be assumed a fool.... |
| This morning I played around with new latch designs for the flip-down entry door from the cockpit, which has been a real challenge. When I welded the door, I added 2 tabs with the intent of mounting a snap-buckle type of latch to the frame. | |
| Problems arise when the door is open. The
buckle would flail around aimlessly snagging clothing, eyeballs, hair,
fingers etc. Not such a good idea after all. I ahve searched all over
the internet for a solution and found nothing useable.
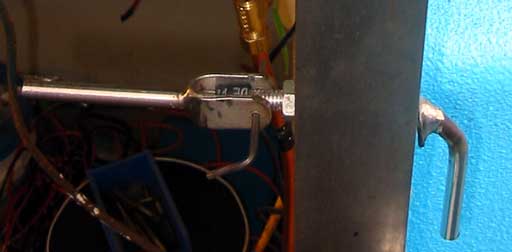
In the photo to the right is a real promise of a light at the end of the entry tunnel. No, it's not psychedelic jewelry from the '60s, or a lollypop for a robot! The idea is when turned across a pin, it pulls the pin in. From what I saw it works. The door must be slightly modified to fully test it. |
 Yummy! |
| The rest of my morning was
spent making the top door latches. These must go right through so they
can be controlled from either side. There is ( of course ) another
problem with the inside part of this setup.
In our (my) infinite wisdom, a whole bunch of things have been mounted within 2" of the edge of the door, soon the be hidden inside a locker that will use even more space. Stationary handles inside are totally out of the question! |
|

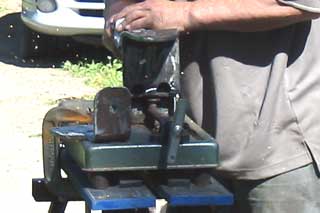
| A real solution had to be thought up, real quick! When I set my mind to something, it must be done, now. The photo above is a pictorial of how I made it work. The tuning fork is actually the handle, not the shaft. The shaft had to be threaded using a 3/8" die. I have hardly any experience with making threads "on" something as opposed to making threads "in" a hole, which I have done hundreds of times. I'm surprised it came out as good as it did. | ||||
|
The final "nut" will be a
self locking and a washer so it stays locked in place.
The latch plate is welded to the non-threaded end and the handle on to that. These plates are oriented differently as shown previously in the animation . They are designed to achieve a 3/4 turn instead of just a half turn like the hatch locks. They worked just like in the video! The tuning fork handle is attached via a hole drilled through the center of the threaded section. The problem of the handle hitting the side of the cupboard inside has ( may have ) been solved using a chunk of rubber hose over the tuning forks inside end. It holds the handle up until intentionally pushed down or up. It works like I had hoped, but may wear out with time. The allen wrench is temporary for a small bolt and nut. As a last resort, a large thin rubber hose over the whole thing might work. I tried a spring but it just kept bending, and didn't pull the handle up enough. |
|||
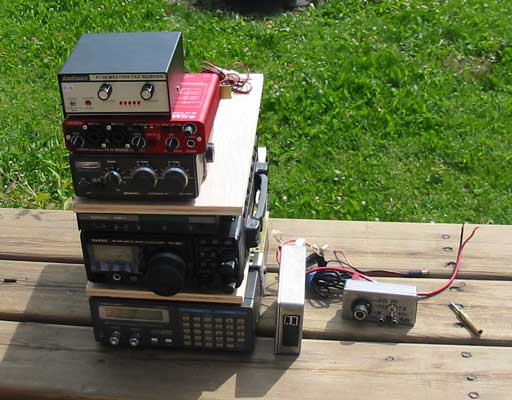 |
Worst case: one can reach in
through the top hatch and undo them lol! I was going to continue and try to make latches for the top hatch, but evening was upon us and I decided to do something a little less demanding. This pile of radios and studio equipment has been sitting around in the boat for several weeks now so it's time to show them their new home.
|
|||
 |
Off of a cutout panel I glued/screwed 3 shelves to support the radios and brackets of the various apparels. Pictured is the HF/VHF rig, a TNC, an old (but trusty) Radio Shack scanner, a manual antenna tuner, (old habits die hard!) a midi/audio mixer box, a WXsat receiver, a high powered USB hub/5v&9V supply, audio switcher, and VHF antenna switch. (not shown) | |||
 |
||||
| Thanks to the miracle of time lapse photography, and/or my unwillingness to keep the site updated -what-have-you, the panel is shown in place with an extra coat or two of Varathane. The switches are to turn on main power to the PC and it's peripherals, an over-desk light, colored lights ( and I ain't talkin' red baby! ), and a spare. | ||||
| This week while at work, I ,managed to find
some time to put this little cutie together. It's a remote head for the ham
radio shown above (FT-897) that will be mounted to the dash so I can yappity
yap on the radio nets during my watch. For more on this CAT interfaced creature, go to it's very own page here. |
 |
Day 403:
14 hours - Made radio panel, redid engine mounts, cut out frame for new engine
position, made latches
to DAY 402 |
 SAIL1.HTM |
to Days 404+ |