| Day 410 |
 |
Trans-mission/
side panel |
| Day 410 |
|
Trans-mission/
side panel |
Along the pilot seat there must be several controls. Yeah we like controls! In fact the more cool knobs and buttons, the better! Kidding aside, the obvious and most important control to be at hands reach is the throttle and shifter. We found a surface mount set that match the vertical ones on the pedestal, one red knob, one black, so no mistakes are made. Of course I can't exactly remember which color is what, but after "throttling down" rapidly in a marina throwing it into reverse, I'm sure I'll remember.
Because Gena demanded access to the space under the right side from in front of the seat ( I didn't realize how far the muffler would be sticking up ) The whole thing suddenly became a little more of a challenge. The bottom of the side panel had to be risen up a few inches, then shifted inward to match the edge of the dash. Lots of framework is needed for all these turns and twists. Because I can't stand raw plywood edges or sharp veneered plywood edges, every corner must have a round solid oak frame on it. Insetting with the router and creating 45º angles seemed to be a good way to do this. The frame in the photo above is to terminate the bottom edges of the ply so one doesn't catch one's hair as squeezing into the tight space under the deck. It is a very good access to the lower dash wiring, pump out/diesel/water hoses and a good storage area. A sliding door will be added enabling the "hole" to be bigger yet. |
||
 |
<<
Multi-angled routes in oak make an odd looking frame! Checking for fit>> |
 |
| Once I finally got it all
together ( took all day into night ) I weighted the top down to make
sure the foaming gorilla glue didn't push the little nails out and lift
the thing up. The little SS vents are for a partial engine intake that
happens to run right across the muffler. Good to have circulation in
enclosed areas. Plus, they look cool. Other things that must be added to this armrest panel thing is a mouse pad for the PC, an exhaust valve lever, switches for lighting and just the sake of switches, a joystick steering control, and the electric seat controls I am going to scab from the car. |
||
 |
|
| Once all of that stuff is on there it'll look pricey and techno I'm sure! Also need to add lights as well. Whether they do anything or not doesn't matter ha ha. | |
| The valves and connections for the
bilge, cockpit seat and floor drains, and the coaming drains all have been
connected to the aft standpipe.. It was one of those "round tuit" things. At
last, no more spiders crawling up the spout, the think they're in but
they're really out!
|
 |
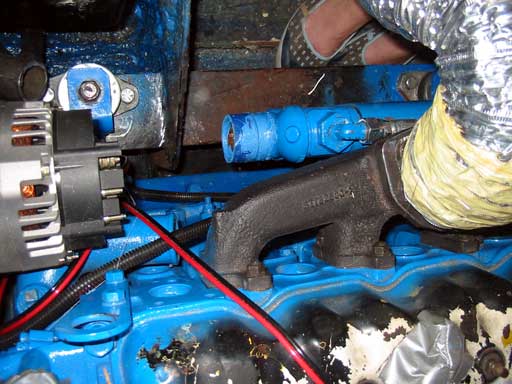
| Gena holds the heat exchanger for
the transmission as it is ready to go in. This thing uses the water going
through the engine to cool the transmission oil. A gauge in the dash has
been run to sense the transmission heat. Below shows the unit in place. Next the water line will be connected. |

|
 |
|
| The transmission ( photo right,
now blue ) was a bit of a bugger. The elbow wouldn't fit on one of the pipes
because of the angle it came out at. This meant the hose would be too short.
As these need to be made up, a trip into town would be involved. Gena swore
and cursed a while until she realized that just switching the hose around
end to end would make it all work. Aaah, peace again! This whole engine thing has me quite nervous. Will it even start? Will the water system leak? What else could go wrong? |
 |
Day 410:
13 hours - Built side panel along seat, installed heat exchanger for
transmission, connected up drain sys aft
| Sandy's CB is for sale | ||
 Contact: (780) 986-7433 |
