| Project 10 | 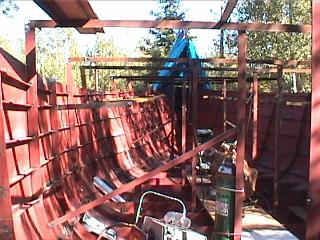 |
Deck & poopdeck Installation |
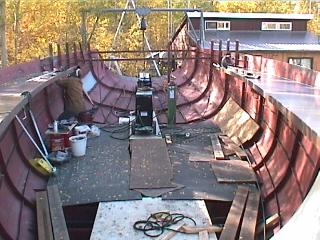
| We have decided to blend our efforts, Gena doing interior hull welding while I evened up the deck stringers in preparation for putting on the side deck beams. | ||
| The deck stringers had become distorted up in places and down in others. This could have be from the stress of applying the plating, or from uneven concrete or stongback. We're not sure, but it was out up to half an inch! I derived an average using the level and a long flatbar to get a flowing curve up to the bow. It was leveled also from port to starboard. Gena was impressed he he. |
 |
|
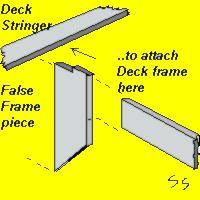
| The false frames, ie. the half
frames reconstituted a few inches below the deck stringer were made up and
tacked in place. Sorry there's no photos of this for some reason, so
you'll have to put up with another one of my 'dimensionally challenged'
drawings! We made them snaped off at one end and about 8" long. The half frames aren't running above the web height due to weight concerns. It's best to keep the weight below the waterline wherever possible. |
||

| The deck stringer was slightly bent around
during the plating procedure so a new deck alignment was in order. Fairing
by eye and using a level as a straight edge was the only way we could
think of getting the smooth curve back.
To tack on the deckframes, we used a cambered
piece of plate made from the blueprints as a guide and started at the
widest part of the hull. The frames still need to be trimmed off as
their lengths were over cut some. I thought this would be much more
difficult than it actually was. If I had to do this again, I probably
would have done it the way the designer had suggested. This would be to
use full size, cambered pieces, the cut them off using a guide. |
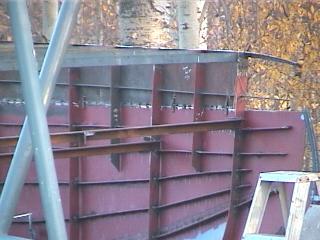
| The trimming and fairing of the deck frames went smoothly! The 2.5 inch flat bar was used to mark for trimming, and the curve was iterated ( one to the next ) for a constant curve ever closer towards the bow. | |||||
| I would say much of our success
was based on luck (hehe) as three factors were in play. One was the curve
of the longitudinal (2.5") bar. Two, the vertical curve of the deck
frames, and three was the length and angle of the frames.. well that's
four I guess! We had to check for congruency between the port and starboard sides just to be sure, but all was fine. Could it be we're gettin a knack for boatbuilding? |
 |
||||
| Many methods could have been used here, but for us this was the quickest and most economical way. The real test will be putting on the cabin sides! Yikes! | |
| As I was doing the work on the deckframes,
Gena did some final welding around the bow area, and primed it in to protect
for winter. Work could stop at any time, depending on the weather. The frame that crosses ( pic to right ) and marks where the foredeck ends and cabin top starts, was made from the trimmed down template piece we used to align the deck frames.( a mere sliver of it's former self! ) |
 |

| The ultimate test of our craftsmanship involving the side deck frames will be a smooth fit of the side-deck plating. First we placed the plate onto the deck frames. The batten was a marked square shorter than 2 feet long. This was then run along the bulwark side and marked every 4 inches or so to get the curve the deck plate would butt into. This was very accurate! | ||
| Then a line was drawn and a
piece of flatbar clamped on as a guide for plasma cutting (see right ) The plasma cutting over the frames offered no problems as we simply slid in some scrap 2x4's to raise it up a bit. The piece was then pushed into proper position, marked along the deck frame longitudinal, flipped over and cut, and tacked into place by Gena. We coordinated and got 3/4 of the side deck tacked on in one day! |
 |
 |
We're really happy the weather is
holding out long enough to do this, and hope to have these plates fully
welded and primed before the snow flies. This way, the "tent" ( that leaks profusely no matter what ) can be tied to the sheer with pieces of 1 x 1 wood, and any water that ran down the inside could be caught and drained by the side decks. As can be seen to the left, a perfect job! |
| Gena tacking on side deck plating | |
| The decks are smooth and curved
perfectly into the bow area. A sigh of relief! Walking on the decks is a cool feeling and gives one the idea of how it will feel running up and down the boat. Of course, stantions would be nice right now as it's a long way down!! |
|
Poop-deck Installation
| Now the last piece of side deck plating is on, we have decided to put in the subframes for the poopdeck and even them off for placement of the cambered poop deck frames. This way we can get the aft part of the boat covered in. ( With plywood for now ) | ||
| I cut out the frames and slotted them while Gena welded them in. The object was to get the tops to taper in where the plate would end up on the side. This edge will then be the seating for the 1/4 of 2" pipe we plan to use as en edge. Some grinding was required on the existing frames as the stringers had held it out until it could butt into the frame itself. This was a lot easier than trying to push out the plate, possibly causing a distortion in the whole hull! |
 |
|
| Getting these even with one another was a bit difficult and did take the rest of the day to complete. | ||

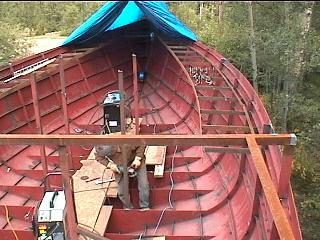
| Today a lot was done! While Gena finished off "upstairs", I curved 7 pieces of 2" flatbar for the poopdeck ( and cockpit seat ) frames. | |
| I used the old frame bender we made last year for curving rogue stringers and aligning frames. 6 1/2 180 degree turns every 6 inches starting from the center going out would get them pretty close to the prescribed camber. Then a bit of touching up here and there would get it exactly even with the "original" made from the blue-prints. At first it doesn't seem like it's even starting to curve at all, but then slowly it takes shape. ( Pic above ) |  |
 |
When putting up frames, we used a 2x2 square
tubing for level and something to clamp to, and tacked them in place. Once
released they flopped around but would come back evenly. The trick is to
make sure the centers are flowing back (or level) as well as the ends. At
first glance this seems to be a simple framework, but, as in everything on a
boat, there are really very few straight lines! Ie. - The camber must remain the same from fore to aft on the poopdeck. (The plate wouldn't compound curve) - The top of the sides must be straight and level.( Or it would end up looking like a saddle! ) - But the beam narrows as one approaches the transom... - So how can the poopdeck center, ( imaginary, as this will be cut out for the cockpit floor ) be level or straight?? |
| Well, it isn't! Ahhhh the beauty and complexity of a sailboat. It boggles the mind ! | |

Maybe my little
drawing would explain better (exaggerated of course!)
|
|
|
| Hmmm... downward curve isn't even noticeable in pics, but it is there ...honest! | |
| After a weekend off visiting family, we're
ready to get things buttoned up for the winter! For some reason we really want to get the poop deck on, so we braved the ( it doesn't look it here, but you don't need snow believe me! ) sub-zero temps and did it ! |
||
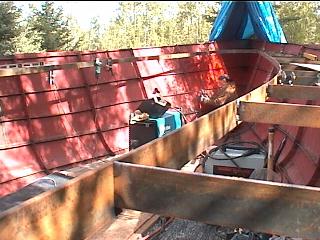
| Splitting pipe that small (about
2.5" ) is harder than the big stuff. It had a tendency to curve alot thus
making the second cut along almost impossible. I ended up tacking on a piece
of flat bar with the same curve, so I could use it as a guide. We'll have to
think of a better way of doing that! In the pic above, the curve can be seen. It straightened out when pulled into position quite easily. |
 Warm muffins and a hot coffee were in order! |
| We are putting on the split pipe because it rids one of the sharp corners that can't take impacts, shoes, and rope dragging across them as long. Also because it looks nicer hehe. | |

Plating Poop Deck
Wow what a great way to wrap things
up! The deck plating went on so smoothly we almost feel we're getting good at
this stuff! We layed the plate on top, Gena marked it underneath, I cut it,
ground it off (pic above ) and gena welded them in. Done!
It was a good thing too as it got really cold and we had to get the tarp
organized, and get some boards on top. We really don't want water, ( or ice for
that matter! ) filling up the keel....something about expansion?
Anyway we need a break, but we'll miss working on her for a while.
![]()
to Individual projects main page