| Project 8 |
 |
Welding it all up |
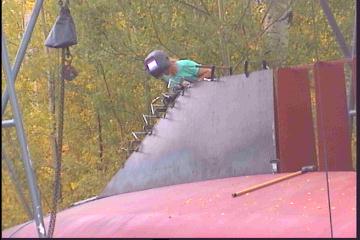
| Before putting on the keel
plate, we have decided to weld up some of the hull. ( Also the plate isn't
here yet! ) The first, and logical place, is at the bow stem back to the keel. As can be seen in the photo above, a sequence of welding is needed. Gena is the expert welder of us two, but I did have a go for practice. A lot of filling is required as the plate isn't butting hard up against the stembar. This way one is assured of a strong weld and good penetration. ( In our opinion ) |
|
 |
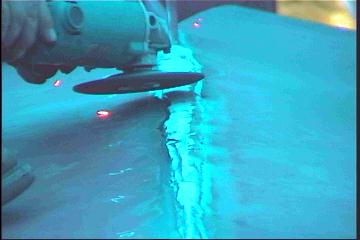
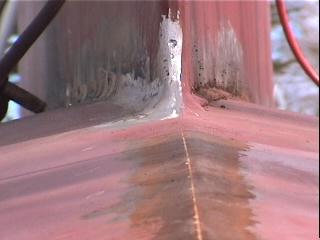
The joins could be ground
smoother, pic at left, because penetration was good, and there is good
exposure on the inside in this area. The designer suggested leaving the welds untouched, but we just couldn't bear the site of it! Along the keel will have to be left though as it is a near 90 degree corner and likely is a high stress point of the hull.
|
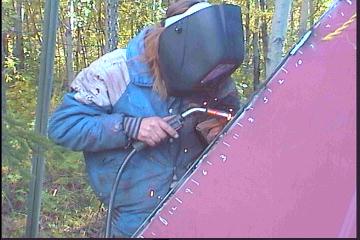
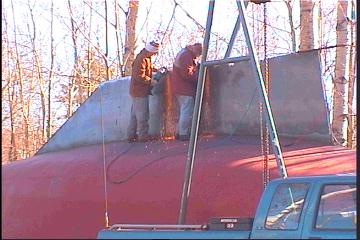
| Welding in a tent is a bit like
a blind man playing piano. If you sit him in the correct position, the
music sounds great.....but one key over and people start leaving the room! The penetration area was available but keeping on track was very difficult. Also the wind was on and off even through the tent. This turns even the best weld into a bubbly mess. Gena spent the whole day on the aft end from the keel down the aft stembar. She wasn't a happy camper needless to say. All I could do was plasma cut the deck frames between welding times. (Only one machine can be running at a time ) |
||
Unfortunately, the bow couldn't be finished today as the wind was blowing hard on the bow where there is no tent cover. Oh well, that'll give us something to look forward to next weekend! |
||
 |
 |

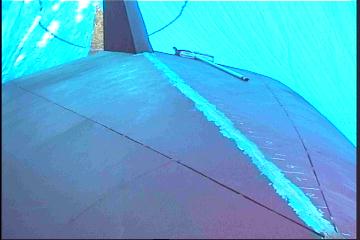
For most of the day Gena welded, and I ground the welds along the 1/2" bottom plate. It is very slow and tedious but the finished curve will look fabulous once done! The welds there are thick so they can be ground off. We're still not sure what to do along the bottom of the hull to keel join though.
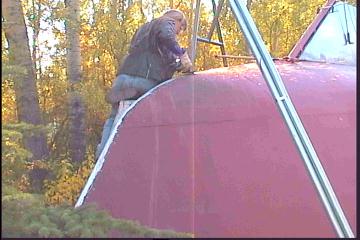
| As we are back on winter hours
at the shop, Saturdays are no longer available for working on the boat
so we try to make our one day per week count ! The keel bottom to side plate join was badly in need of completion, so grinding and filling was the order of the day. Happily, Gena bought us a new 6" grinder which did the job much quicker and effeciently than the 5". |
|
 Rounded edge of keel bottom |
Inevitably some of the welds left small holes that were deeper than could be ground down. These were to be filled. We tryed the large MIG but found it would only undercut to create new holes, so it was decided to use the small welder instead. The welds wouldn't be structurally important, therefor it became my job to do all the filling as Gena followed with the grinder. Me welding below the |
| waterline could spell
inescapable doom to a dry interior in the future haha! I feel more confident in Genas' abilties in one sided welding. She has had some "farm" experience many years before I even knew what welding intaled. |
|
| Next, the keel to bottom was rounded off for a soft corner. The round is a bit over 1/4" radius off of the 1/2" plate. This shouldn't decrease the strength of the join as none of the effective weld was removed. The pic at right doesn't really show justice to the improved look. Once primed, it took on a very solid looking addition to the hull ! (Even though no-one will ever see it underwater, we finished it with pride! ) | 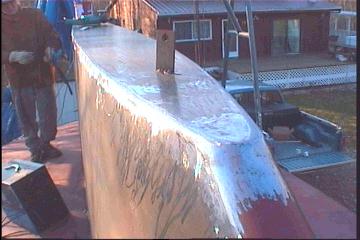 |
|
| Each time we finish up, we prime. Who knows when winter will come so best be prepared. | ||
|
Our first day back on the job went by quickly,
and WOW!! are we out of shape!! |
|
| Why not smooth the join into a round arc so the keel plate would flow into the hull plate. I had just picked up some cone shaped grinding stones for the grinder and figured they would make the job a snap! The moving image to the right explains it all. The gray ovals are welds. As far as we can see, no strength was lost in this process, as the origional weld size is maintained, and others have been added on each side. | 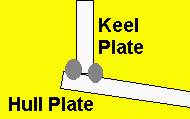 |
| It looks pretty easy, and it was. Just slow going as we only did one side in 7 hours. Getting rid of tiny pockets and valleys was very time consuming. Once again the little Mig was used for this. | |
 |
The finished look is much
better than the ridged "hump" was before. (Right side of keel in photo)
The smooth, uncomplicated surface might even be easier to clear of buildup
once in the water! Once the day was over, we both felt we had done well and felt pretty good about getting back at it. That is until the next morning..OUCH! |

| Welding the hull is really one of the "easier" things we will have done. As we have no prior boatbuilding experience ( in steel ) every little thing is a new experience. The welding of the hull below the waterline is a particularly touchy issue for us as, well let's face it, we don't want any leaks!! Butt welding 2 pieces of plate together to be strong is a different idea than making the weld strong, sealed, and flawlessly straight with no running off. As the welding surface changed from horizontal to vertical, this became increasingly difficult. For the most part, today was successful, except for the last weld. We made 2 mistakes. One was mine , the other was Genas. |
 Oh boy |
For the most part, today was successful, except for the last weld. We made 2 mistakes. One was mine , the other was Genas. As can be seen in pic to left, my welds weren't exactly along the center of the two plates. Some ran amost right off and created weak points in the join. Of course we didn't realize the magnitude of this error right away. Gena welded from inside after I had finished the outside. |
| Because this entire join will be above the waterline, we are able to grind it down to a smooth finish. ( Whereas under the water, it has been recommended to leave the welds to their full thickness ) This was when the problem showed up. The weak welds that obviously hadn't penetrated on one side or another, cracked away once welded from the other side. Probably during cooling. |  View from upclose...hairline crack |
| Oh well! Back to the drawing board... Gena has an idea to "straighten" things out a bit. We'll see if it works next weekend...this one's done! | |
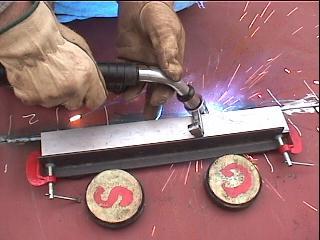
Welding down the hull
| Great !!! Gena's little invention came
through for us! As can be seen in the pic above, it's a guide for welding. It guarantees a straight good looking weld, with the ability of the welder combined of course! It's held on with small mag-mount CB antenna magnets glued to the underside of a piece of 1" angle steel, and a piece of aluminum channel to allow for height clamped on. Then the 2 large speaker magnets offer extra support as iron filings are slippery critters. The rivets on the speaker magnets were left on to bite in for good grip. She then put a piece of antenna mount drilled out to fit the welding torches tip cover that rides on top of the aluminum to keep the height. |
||
| The tip still must be wiggled
back and forth as welding but the guide always stops it falling of
track. ( That is if the guide is on straight in the first place! - pic
to the right haha!! ) It sure has improved things anyway. A steady hand is difficult in uncomfortable conditions. This has really helped, and we're girls so we're able to admit we're not good enough at it lol! |
 |
 |
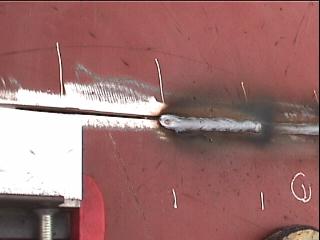
To the left is a typical
undercut weld on a vertical surface, we did a few of those before getting
the amperage set right for the conditions. This was one of Genas too, I
won't show mine because I hate simpathy emails ! It took a long day to weld the horizontals from bow to stern, but that's almost 90 feet of welding. The weather was just perfect except the late afternoon when it became windy. |
||||
| Weld with undercut on top, shadow shows it up | |||||
|
|||||
| The welds would have little
bubbles in them if ANY wind at all got at it during welding. Sometimes we
wish we had've built a shop to build in, but then miss all that glorious
sunshine??
Next weekend we do the radius vertical welds. Can't wait! |
|||||
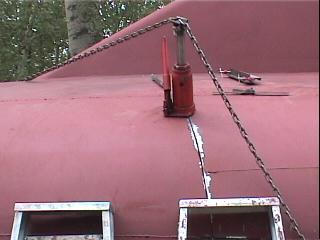
| Today we concentrated our
efforts on fairing in the radius vertical butt joins. They were pretty
close the ones we did today, but WOW does it ever look better now! As seen
in the photos we used the jack and chain again, as we did the latter part
of last fall, after discovering it worked really well. |
|
| My modest but useful modification came into play today. Last year the problem with the jack was that the chain kept slipping off and the links had to be balanced just perfectly across the head. So I bought a 1" pipe fitting that just barely made it over the head of the jack. Then tapped it for 3 large setscrews, and welded a piece of angle on top to hold the chain. Frustration was non-exsistant today I must say! ( See right ) | 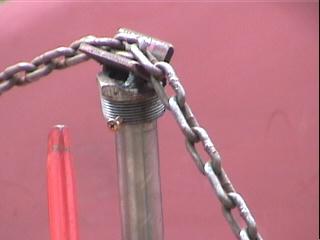 |
| Everything went like clockwork, even the weather that was supposed to be rainy and miserable held until just minutes after our last weld, and we had the boat covered and equipment put away. It then poured for hours after. | |

Welding welding welding.....
| As most of the past 5 days
have been pretty much the same thing, welding and fairing, this page
will cover all of them so as to not be tedious. This is why there
haven't been any entries to the site since the beginning of June. The first fairing of the radius vertical joins, done last year, were very rough...even though we thought we could get them in smooth the first time around. It just couldn't be so. Some of the joins were redone after all of the plate was on, and with success as the first ones from the bow. This past month, aside from welding all the plate of the hull, we further faired in the radius joins, and yes it looks 100X better! Now we have noticed the plate below the joins has been pulled slightly out. It really is noticable if the sun hits it in the evening at a sharp angle. These of course (only 3 ) need to be fixed as this would be a constant bug once we're "out there" cruisin' ! The sledge "may" be used here ;o) Anyway, this brings up the question, how perfect should it be? We're not willing to trade of time spent and effort involved for a slightly "not so good looking boat". But where does one draw the line?(or the curve....bad one! ) Is it getting better because our expectations are lower? A good example is the designer suggests leaving on the welds below the water line, instead of grinding them off smooth. To me this is ugly. Also, in my experience, paints or coating systems always wear at high pointy ridges. If we decide to leave them fully on, then they'll have to be filled on either side with compound filler. Luckily above the water line anything goes! Sitting in calm waters, this works great! But the sails are hoisted and the wind catches them..don't look! We're going to heal! Below the water line will definately be a dark color. |
||
 Rain rain rain didn't stop us! |
In the photo to the left,
above and below the unpainted weld can be seen how things may look. The
one above will be ground smooth as it is above the waterline, the center
one won't be. Overall the hull came in very nicely and finally looks like a boat! Once the lines go that way, it makes you want to make them better, really. A deep sense of pride evolves and any flaws become the enemy. The wet hull after a rain can accentuate this! |
|
| ;o) | ||
 Camp Dulci-Darlene! |
The rain was rather persistant over two weekends so we had the chance (whether we liked it or not! ) to see the hull as it really is, and will be when wet. We have come to see how time-evolved skills in metal boat building would have been a good pre-requisit. Also, the hard way is generally the right way. | |
| We were impressed with our work all the same! | ||
![]()
to Individual projects main page