| Day 454 |
 |
More SS projects,
Auto Helm |
| Day 454 |
|
More SS projects,
Auto Helm |
| Back to some little stainless
projects. I guess it's never "little" per sae but when you have
done so many projects, it's almost automatic in nature. I pull the
welder out of the shed, then unwind the plasma gun or carry out the
cut-off saw which is usually balancing precariously on top of a stack of
grinders, drills, sanders etc. Then look around for materials for the
project in mind. Then the thinking starts, but usually not before a
final 1/2 cup of coffee to spike the thinking process. As the photo above suggests, I had 3 separate things in mind for today. |
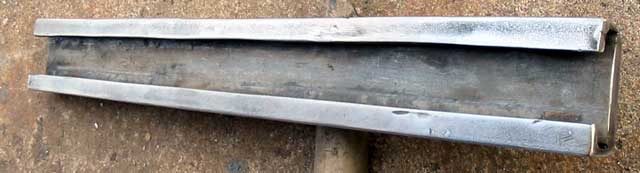
It's a simple enough shape when you look at it, but is a little difficult to put together. I took a length of 1.5" flat bar and wrapped it in paper then masking tape. This is the track template I must weld the shape around. The paper and tape is to allow the shape to be slid off afterwards, and to prevent any welds from getting to the inside flat-bar, which would be a disaster!. I could have just lined the pieces up without a template, but shrinkage of the welds might end that shape really quick! |
|||
| The shape in the diagram is how I put it together. I used 3/4" angle off the edges, cut down to 3/8" or so and 1/2" on the other side. A minimum space of >1" must be maintained. As it happened, Gena had to cut those down even more as they were binding. Because of the paper and tape, there was a crack to weld closed so I lightly clamped it all and went to town on it. Once everything was welded an filled and ground smooth satisfactorily, I started to pull the inside flat bar out. |

|
||
The little picture above shows one on the track ( sorry that's all I have for now! )
|
|||
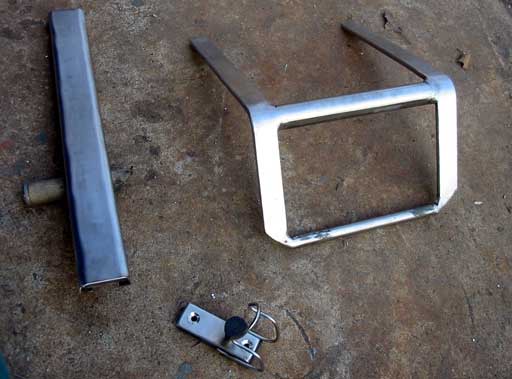
| Next on my list is the
amazing toilet step. When I was trying the toilet out ( well pretending!
haha! ) and noticed the back wasn't supported (day435)
I also noticed the way my feet were up on the little ledge the toilet
sits on. ( The toilet is high so as to get max. space running it up the
radius of the hull) This is fine on dry land, or sitting at anchor, but what if the boat is healing to starboard? The center of gravity would be way out and a person could slip right off! Try not to envision that too much lol! The solution is to have a fold-out step. I made one in Maya so I wouldn't forget the design, but it wasn't too practical to use rod, especially since we're out of that size of rod. The little video shows the basic idea of the thing. I don't have any pictures of it in place, and the boat isn't where I am right now, but the wood pivot is the same as in the dark video. |
|
||
| The angle of the unit isn't 90º either, just like in the video. The floor is already beginning to curve up there. Once it was polished up, it looked fine. Oh, the things us sailboat lovers must do to make everything work! | |||
 |
This photo (left) is of something
I nearly forgot. Isn't it cute? It's a door catch for the entry door in the
cockpit. Without it, the door would just swing back and forth, hitting
whatever or whoever off the seat every time the boat healed or went down
into a big wave. Getting the shape right was just an "eyeball" thing because
I knew if I measured, it'd be wrong and I'd be angry. Because it was done by
eye, if it was wrong I'd think " oh well, it was close. Not bad by eye!" I
wouldn't want to be a psychologist. The hand bent 1/8" SS rod was tacked along underneath, to minimize cleanup, as was the 3/8" stub of rod going through the flat bar. By the way, the proper way to do a weld like that it to taper the edge of the rod in at least 1/8". That way there is a weld bead left after it's ground back flat. The lazy way doesn't work at all, I know. :) The whole thing sits on 1/8" rubber and the rubber on the 3/8" rod is actually a radio "foot" turned around. I has intended to use a rubber cap of some sort, but this looked so great I had to use it! |
 |
There it is in place (photo left)
and lined up with the latch tab on the door. To release it, one must pull on
the loop part of the rod. It will not move no matter how hard you pull, yet
is easy to snap in, even when opening the door from inside. It doesn't even
rattle. This made my day. It works! |
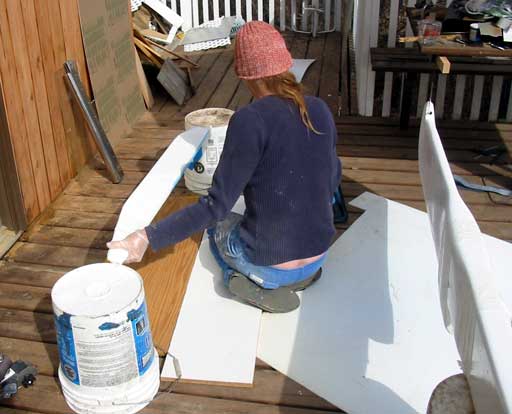
| Gena was also having a good day.
The autohelm rudder and it's smaller steering tip hung, partially finished,
in the porch for the whole winter, each from it's own nail. It blew in
the wind, twisted around, twisted back, made a creaking sound, but never
fell. The porch almost looks strange without it hanging there ha ha! She smoothed it with the belt sander and several belts, re-gel coated, then applied the blue color below the water line. A big job for a day. You'll see the finished rudder on the boat shortly.
|
 |
Day 454:
9 hours - made toilet step, door latch/bumper and track slide stock. Finished
Auto-Helm Rudder
| Replace
this button with a link to your site, mailme ..to Main page |