| Day 394 |
 |
Dash cont. wiring
aft |
| Day 394 |
|
Dash cont. wiring
aft |
| Now the pilothouse is all nice and clean, free of sawdust and mess, Gena can access below the floor again. The fill and tank vents for the fresh water tanks were put in. (Inset in above photo) The vent doesn't really need to have a hose on it as the tanks will never be full to the top, well, if we're paying attention to the level indicator! Notice how tiny the fill is? Not a large volume of water will come from the water maker, it's more like a trickle that slowly fills the tank. The tank on the opposite side has a very large fitting that feeds water in from the water fill fitting outside. This probably will never be used as water at marinas in many parts of the world can be questionable. | ||
| The whole idea, as shown on
day 311 is to fill one tank first, then pump
that water into the other tank after certainty the water is good. (i.e.
the membrane in the watermaker didn't blow out) This is more a safety
than anything. We were going to put in a small day tank, but why bother?
Having large 2 tanks is a real advantage. The photo to the right shows the "was going to be simple" setup for the pressure washer/anchor chain wash connections in the sail locker. The idea is to be able to use the pressure washer or not, and to have salt water or not. The "Y" at the top can send water to the pressure washer inlet or directly to a standard garden hose. The 2 inputs are pressurized salt or fresh water. If both valves are open, the fresh water will win as that is a pressurized system so no chance of contaminating our drinking water. The pressure washer can be removed easily to wash down the boat if we don't feel like doing the "deck scrubbing slave" thing! Can't wait to try it all out, the decks are such a mess with the poplar trees dropping their sticky yellow bounty like rain on everything. |
 Pressure pump setup |
 Flux-gate compasses mounted in "proposed" place |
Gena has done a fair amount
of research on location of flux gate compass sensors on a steel boat.
When I was building her little
desktop organizer, which has a tiny binnacle, wheel, and compass, I
noticed as I carried it through the boat that the compass was going
crazy. Pointing one way, then another, sometimes towrds metal, sometimes
away. I thought to myself, this is bad! How will we ever have a
compass?? According to several members of the metal boat society, a flux gate compass inside a steel boat can compensate itself. I find this extremely hard to believe and think we need to make a giant degausser to get rid of all the magnetic fields. On the other hand, the boat has been sitting in one position for all this time and may depolarize once set in an environment where position changes often. This is the idea according to others so hopefully they are correct! |
| The sensors have
been mounted according to instruction, toward the center of moment in a
low place. This is probably so the auto righting little balance thing
inside can work. I don't think the one for the autopilot has that. In any case, articles on the metal boat society are well worth the read as others have already experienced it. It's way too in-depth to present here. |
|
| After Gena decided to add another
gauge or two, I realized there is no longer enough room in the top panel the
way I had planned it. Also, I forgot the large wind gauges go back almost 5"
and this would prevent the panel from swinging out, so they needed to be
moved an inch up. The white charge amp gauges had to be moved to the bottom
because they stick out too much for the panel to angle under the top board. Now there isn't enough room for the spotlight controller ( shown floating in the bottom right corner of the photo ) and my remote radio controller. Oh well, I was already considering moving the spotlight joystick to the arm rest area as it is too far to reach when sitting. The radio head is better off down low next to the vhf marine as the mic cord won't hang over the dash. It all works out better this way!
|
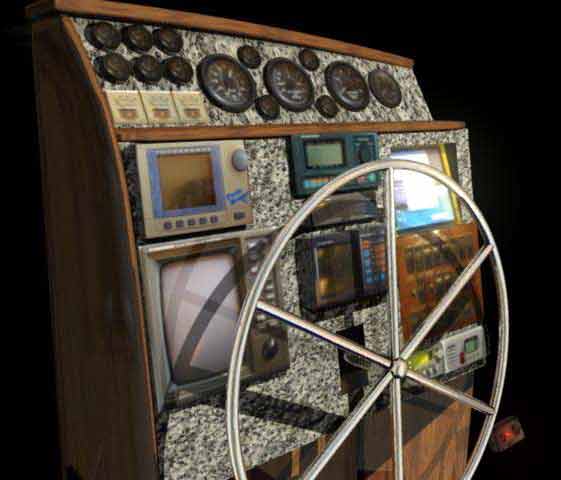 |
| I have found that turning the tablet PC upside down and angling it back some makes better contrast when looking down on it. The computer can be preset to be any orientation luckily. The auto pilot is now on top and inset on it's own mount. This was because the weight of the thing deserves a solid mount from the shelf. The small compass is above the big GPS because it would be blocked from view. Most of these components came without brackets so face mounting the GPS, twin-scope, and compass is better ( and easier! ) | |
| So I set to work today cutting out the panels to try out the new design. Most gauges of this sort are 2" hole size, but to my surprise the fuel gauges are just a slight bit bigger. 2 1/8", go figure. | 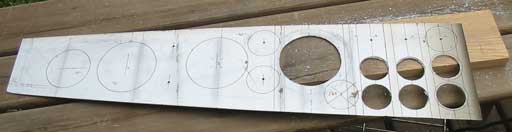 |
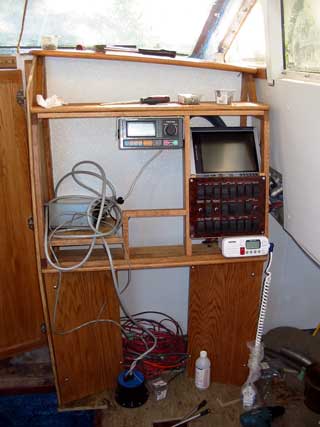
| The bottom kick panels, put in place during the week sometime, ( sorry I can't remember when, one day fuzzes into another when so busy ) are removable so the central electrical breaker panel can be accessed / wired. The cut out on the side of the dash is for this panel. We will be using the switch style breakers so circuits can be shut down independently, good to shut down "vampire" systems when away from the boat for long periods. | 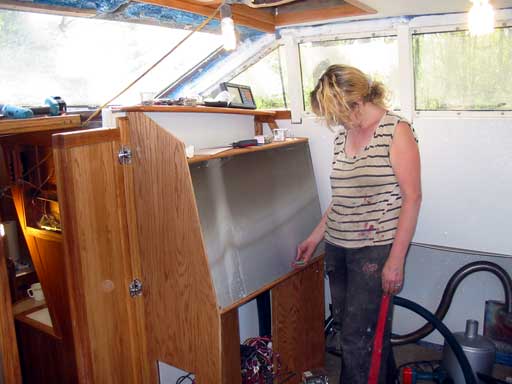 Me trying to decide on where to drill the panel mount screws |
| Blog: While on the subject of vampires, I heard a megawatt/day value ( can't exactly remember how many though ) of electrical load for the entire USA due to people using vampires mentioned on a TV program the other day. An absolute waste of power provided from coal and natural gas burning plants spewing CO2 into the atmosphere as a large percentage of the whole. What is a vampire you ask? I unplug the buggers and do my part in saving energy/the environment whenever possible, but it's easy to forget and leave them plugged in. It's a way of life and design left over from the wasteful 70's and 80's. Now China is copying the old technology and selling it to us as consumers so we're doing it all over again. I think living on a boat will purge any habits of taking power for granted in an "every amp/hour matters" environment. This is all on my mind right now because while I am writing this page there is yet another power outage ( probably due to the huge amount of rain we have received this weekend ) and I am running on an old U.P.S. hooked to a car battery. My PC draws nearly 300 watts and the U.P.S. can barely keep up, but when it's turned off, it *is* off. I have done my part in saving the planet by informing you about vampires. :) |
|
As can be seen below, the main panel is
beginning to take shape. During the evenings this week I will cut out more.
( If I can figure out the size of the hole for the tilt steering I have yet
to build! ) The photo to the right shows the switch panel in place. The tablet PC won't be angled back that far but perhaps 2" or so. |
 |
|
So far, so good. The top panel still has a
little bit of space, but not much! The illumination has been an issue as
most of the gauges use bulbs ( yuck! ) and are colors like green, amber,
blue-green. Very bad for night vision. As we have been acquiring them I have
been taking them into work and replacing the bulbs with red LEDs. Much
better. These LEDs will be easy to dim with an LM317 variable voltage
regulator, a better method than RF noisy PWM dimming of several amps of
light bulbs. Because the LEDs all have 1.1k and are the same, they will all
dim to the same levels exactly.
The fuel gauges again are being a problem. The bulb hole is less than 3/16" so I had to use SMD style 180º LEDs instead, and color them with a tiny piece of spotlight gel for the red. Brother!! |
 |
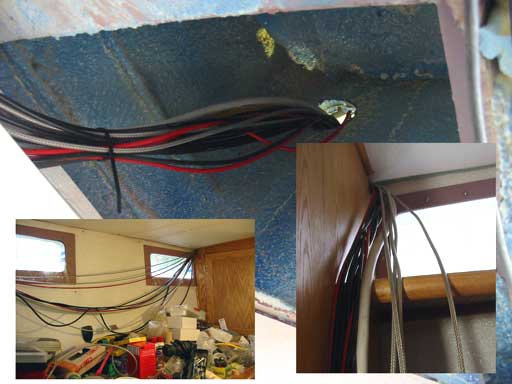
| Lastly, Gena has been running cables aft.
(photo/insets right) The holes we thought would be big enough but they
aren't so second holes were cut and expanded. Hopefully this is enough for
the cable tray over her desk aft or wire will need to be run somewhere else.
Included is the main cable for the breaker panel aft, wires for nav. lighting, radar antenna, wefax, wind generator, water generator, HF coax cables, GPS antenna, inverter 120 VAC plug, video monitor and more stuff I have probably forgotten. Some wires go under the floor once they're in the aft stateroom as well. The rudder indicator, pedistal cables, and whatever else is there. Other wires that come from the breaker panel for lighting, fans in the head, the head, lighter sockets, water solenoid, ham radio, wefax power, + + +. |
 |
If you want the comforts of home, the wiring is intricate. One could probably gauge how comfortable a boat is to live aboard by how thick the wiring clusters are lol!
Day 394:
12 hours - Continued with dash, wiring aft, tank vents, mounted flug gate
compass senders.
To DAY 393 |
Get
advertising space On this site! |
To DAY 395+ |