| Day 426 |
 |
Lighting Aft, Shelves |
| The morning for Gena started
out searching for the reading lights to go aft. Once found she quickly
installed them and connected the wiring. She asked for my advice on
their placement. "I dunno" I said, I won't be using them ( yet! ) as my
eyes are fine for reading still.
They needed to be somewhere where they won't be torn off but clumsy elbows in the night, but can't block doors. There was little choice really. After that, she set off installing the fans to circulate moist air from under the berth and related lockers, out. 2 fans under the berth will provide amble force. These are the standard 6" fans like what we used forward in the galley etc. Here, 6" speaker grills ( the large hole type) act as covers. They come with 4 clamps but we're going to try just 2 for starters as the thing becomes pretty gaudy with 4. |
|
| Next to each fan, she installed a switch.
The one below is in the head coming from under the cockpit. If turned on
with the ceiling fan over the bath, air can be circulated right out of
the boat.
|
 Reading light and triple lighter plug mounted
<- Back view of fan, needs cover there too! |
| We have heard over and over
again from cruisers already "out there" that proper ventilation in
cabinets is tantamount. If moisture gets in there, smelly mold will
follow. I've smelled this, and I don't find it too unpleasant, but I
guess one would grow weary of it day after day. Gena also installed a triple switch set that will control over head lights in the aft area. I think one may be for the head but not sure. Time to get going on some more LED lights! My day involved all of the shelves I have put off due to the weather being too cold being made. The shelves in the cabinets under the deck in the galley required some careful thought. I couldn't bring them too far forward because of the angle of the cabinet, and the head board. Insetting the leading edge by 4 inches allows taller objects to be placed on the shelf. |
|
|
|
The lip on the shelf was made from some "already finished" tambour left-overs. Perfect for this!
|
| Getting them in was a little
tricky as the sides are actually inset from the frames. Luckily they just
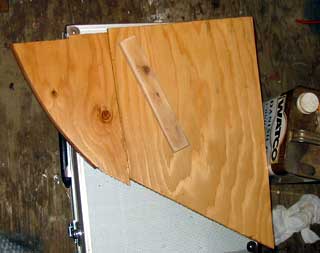
fit. I wasn't so lucky with the triangle shaped shelf for Gena's desk though. There was no way it would go in as one piece. I cut the end off, to be re-attached once on the supports in place, (photo right) to be joined with an oak molding. |
 |
 |
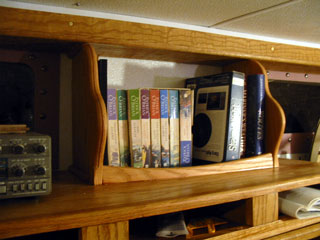
Got the book shelf into place and
screwed down tight. Right away Gena loaded it up with her books and software
he he! The "gate" still needs to be attached, and another coat of high gloss Varathane applied. |
 |
The "split" shelf went in no
problem and was re-attached using screws in pre-drilled holes. I must work
out a latch assembly. A knob or handle sticking out here may be a bad idea
as it is a "rub zone", which means people going aft will be bumping along
this area. An appendage here will be a clothing snagger. All the things that
must be thought out, jeepers! We will be going to Vancouver next week so maybe I'll find something there.
|
Day 426:
12 hours total: Made shelves, installed lighting and fans aft.
.
PS, check out
projects main for lots of new entries!
(JAN2008)
| TO Replace
this button with a link to your site, mailme ..to Main page - Sail1.htm |